Thursday, August 30, 2007

Cleaning Camera Sensors

Published: January 23, 2006

Preventive Measures

There are a number of precautions you should take to minimize your camera’s exposure to dust and contaminants. The most important practice is keeping the body cap or a lens on the camera at all times. Do not remove the body cap and leave the camera exposed while searching for a lens. Always have the next lens selected and ready to place on the camera before removing the camera’s body cap or the current lens. I also take the extra precautions of turning the camera off, sheltering it from the prevailing breeze, and angling it downward to reduce particulate matter entering the camera’s interior. Finally, keep your camera bag clean. It’s senseless to exercise these precautions and then stow your clean camera in a dusty, dirty camera bag.

Detecting Dust

Even with prudent care and handling, you will inevitably find specks of debris on your sensor. This becomes evident within bright, evenly lit areas of your image such as sky, clouds and snow when the exposure utilizes a small f/stop, typically f/11 or smaller. The specks will appear in the same relative spot on every preview as you scroll through the thumbnail images in your image browser. Use the following steps to take a test photograph so that you can accurately determine the degree of contamination and the locations of the dust particles.

Testing the Sensor

1.

Attach a telephoto lens to your camera, zoom to its longest focal length, and set the aperture to its smallest opening.

2.

Manually set the focus to the closest focal point. This setting will include the sensor area within the depth of focus.

3.

Set the camera to Manual.

4.

Photograph a plain, neutral object at +1 stop over exposure. I typically photograph a cloudless sky, white wall, or an evenly lit piece of white paper. Long shutter speeds are fine, we aren’t concerned about camera shake or focus; we’re striving for a light, neutral image that will reveal debris on the sensor.

5.

Use Levels to increase the contrast of the image.

6.

View the image in Photoshop at 100% magnification to determine if cleaning is necessary.

Specs of dust on sensor

This sensor is dirty and desperately in need of cleaning. Specs of dust are circled in red.

Now it’s judgment time. I can tolerate small specs in the corners and perhaps some very small particles in the main portion of the sensor, especially if they’re only visible at the smallest f/stops. Remember, the test image was captured at the extreme limits of exposure, well beyond normal shooting parameters. All of our cameras have some degree of sensor contamination; the question is whether the risk of cleaning the sensor is worth the reward. I only recommend cleaning if there is significant debris visible on normally exposed photos. Sensor cleaning is not a regular maintenance task and it should only be performed when absolutely necessary.

Cleaning The Sensor

Despite your best efforts to keep your camera clean, you have found dust on your sensor and it is significant enough to warrant cleaning. Although, the entire sensor is going to be cleaned, it is useful to know precisely where there the offending specs are located. Keep in mind when determining the spec locations on the sensor that the position of the specs on the test image will be flipped and reversed in respect to the actual position on the sensor. For example, a large spec of dust that appears in the upper right corner of the test image is actually located in the lower left corner on the sensor.

Note: Although I repeatedly refer to the “sensor”, I am actually referring to the protective filter that sits just above it.

So what is the best way to clean your sensor? Your camera can be infiltrated by two basic types of dust: the bits that lightly sit on the sensor, and those that adhere more firmly to the surface as a result of moisture and humidity. The light dust can be cleaned with a “brush” system, but the fused specks require a “swab” system that uses an applicator and solution to thoroughly clean the surface. Think of the process as using a very small squeegee to clean a very expensive window.

Sensor Brush & SensorSweep
VisibleDust (www.visibledust.com) and Copper Hill Images (www.copperhillimages.com) both manufacturer brushes with very fine synthetic fibers that pick up dust when applied to the sensor. VisibleDust makes the Sensor Brush and Copper Hill markets their new SensorSweep. Both work on the same principle, a blast of compressed air or applied friction “charges” the brush with a static charge that, when gently applied to the sensor, collects and removes the dust. Cleaning a sensor entirely usually takes several passes and the brush needs to be cleaned and “recharged” each time. For more stubborn fused specks, VisibleDust sells Chamber Clean and Sensor Clean, solutions that can be used with applicators to clean the mirror box and sensor. Copper Hill offers SensorSwipe a reusable applicator that works with PecPads and Eclipse solution in a similar manner as the swabbing technique discussed below.

SensorBrushes (left) and Sensor Sweep (right)

The SensorBrushes offered by VisibleDust (left) and Sensort Sweep brushes from Copper Hill Images (right) can pick up dust on a sensor.

SensorSwab and Eclipse
Photographic Solutions (www.photosol.com) produces SensorSwabs, applicators with sterile pads, and Eclipse, a refined methanol solution. This system will remove most specks and dust and, though expensive since the swabs can only be used once, is one of the most effective methods for cleaning sensors.

Eclipse, SensorSwabs, and PecPads

Eclipse, SensorSwabs, and PecPads produced by Photographic Solutions enables you to permanently clean your camera sensor.

Sensor Cleaning Procedure

Using the brush and swab together is the most efficient method for cleaning the sensor. I start with the brush and then test the sensor for dust. If stubborn specks still adhere to the sensor, then I use the swab and solution in a second pass. Be sure not to touch the brushes or swabs with your fingers. Clean your sensor correctly by following the following step-by-step procedure:

1. Blow Out the Mirror Chamber
Before entering Sensor Clean mode, use a hand blower such as the large Giotto Rocket to blow out any excess dust and debris in the mirror chamber. This step removes any particles that may migrate on to the sensor after the cleaning process. Do not use compressed air. The pressure is too strong and will result in damage to the delicate mechanisms within the camera.

Hand blower on mirror chamber

Use a hand blower to blow out the mirror chamber.

2. Activate Sensor Cleaning Mode
Canon DSLRs have a menu function “Sensor Clean” that locks up the mirror, opens the shutter and cuts power to the sensor to eliminate the electrostatic charge. Nikon users will need the optional AC power supply in order to access the Sensor Clean mode on their cameras. It is not advisable to circumvent this by simply putting the camera into “Bulb” mode and holding the shutter down. The risk is too great that your finger will slip off the shutter or the battery will run low, both resulting in the shutter and mirror disengaging prematurely, trapping the brush or swab and damaging the mechanisms.

Sensor Clean mode

Activate the Sensor Clean mode on the camera.

3. Blow Off the Sensor
With the camera now in Sensor Clean mode, use the hand blower to remove any large chunks of dust. This initial step won’t likely remove all the dust, but will remove larger specks that could potentially scratch the sensor filter later. DO NOT use canned air. Propellant could be blown onto the sensor or, worse, the high pressure could blow dust behind the filter and permanently trapping debris between it and the sensor.

4. Brush the Sensor
Each of the brushes requires “charging” before cleaning the sensor. The static charge attracts the dust off the sensor when the brush is applied LIGHTLY to the sensor. The idea is to loosen and pull the dust into the brush, not to sweep it off like a broom.
To charge the Copper Hill SensorSweep brush, rub the bristles rapidly over a piece of vellum or other clean piece of paper. To charge the Sensor Brush from VisibleDust, hold the brush upright and use compressed air to blow across the bristles. Be sure to hold the can level to avoid getting propellant on the brush. Now take the charged brush and gently sweep, “tickling” with very light pressure, from one side of the sensor to the other. Use canned air to clean both brushes; recharge and repeat as necessary.

Compressed air on brush

Charge the brush with compressed air.

Charged brush on sensor

Lightly brush the sensor with the charged brush.

5. Swabbing the Sensor
If stubborn specks remain after brushing, then a more aggressive approach using swabs and solution will be required. Open a SensorSwab or SensorSwipe applicator and apply one or two drops of Eclipse solution. Immediately apply the swab to the left side of the sensor. Using the same amount of pressure that you would writing with a pen or pencil, draw the swab all the way to the right. Do not lift the swab off the sensor. Maintaining the same pressure, reverse the angle of the swab and draw it back to the left edge of the sensor. You will have to work fairly quickly since the Eclipse solution evaporates very rapidly.

Swabbing the sensor with Eclipse

Quickly swab the sensor with Eclipse to remove stubborn specks.

6. Retest the Sensor
Take another test image of a neutral subject. There should be a significant improvement in image clarity, but some specks may still remain, especially in the corners. Again, use your best judgment to determine if another attempt at cleaning the sensor is justified.

Clear test image

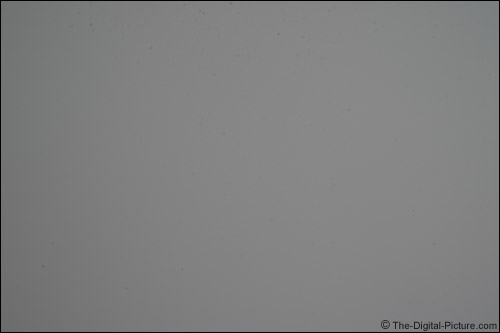
This clear test image shows that the sensor has been successfully cleaned.

Use both of the systems described here to get the cleanest sensor possible and run a test image every few weeks to evaluate for sensor dust. Regular checking and cleaning will help avoid frustration and save hours on the computer cloning and healing spots on every image.

Additional Resources

www.cleaningdigitalcameras.com
Visit Curt Fargo’s comprehensive site for information and sensor cleaning supplies.

www.bythom.com
Thom Hogan, the originator of the now famous “Eat at Wendy’s, clean your CCD” technique for using a modified plastic Wendy’s knife, has shared information on sensor cleaning since 2001.

www.copperhillimages.com
This very thorough site by Nicholas R. illustrates various techniques and products for cleaning sensors and lenses.

SOURCE

Blogged with Flock

Saturday, August 11, 2007

Digital SLR Sensor Cleaning

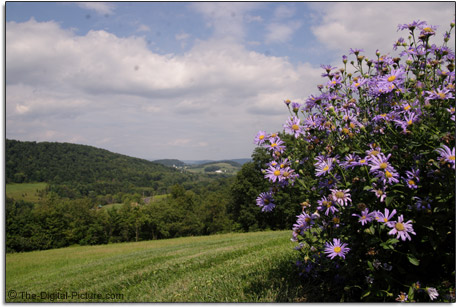
Digital SLR Camera Sensor Dust Sample Picture

What are those dark spots in the sky? One of the most-frequently asked questions I receive relates to sensor dust and cleaning. Some people know they have sensor dust while others only know that there are spots in their images. Some even blame the spots on their lens. Though while logical at first, it takes a sizeable piece dust on/in a lens to show up as a prominent spot in a picture - especially if it is on the front lens element.
 
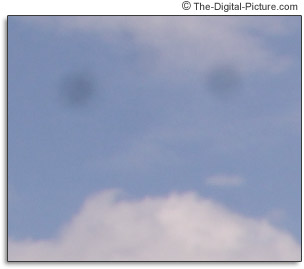
To know if your sensor is dirty, you need to know what sensor dust looks like in an image - see below for a 100% sample crop from the above photo. Notice the frowny face? That's what my face looks like when I see a picture like this.

Digital SLR Camera Sensor Dust Sample Picture - 100% Crop Sample

To check for dust, mount a 50mm or longer lens on your DSLR - select 50mm or longer if you are using a zoom lens. Find an evenly-light-colored, evenly-lit background for a test shot - a blue sky (works great), a white wall, a piece of paper ... many subjects work. Set the lens to manual focus and set the focus to to make your selected subject completely OOF (Out of Focus). We want to see the dust - not the subject - in the picture. Adding motion blur to your test image is all-the-better. I generally use infinity focus and often use a white kitchen cabinet as my subject. You may want to turn off IS if your lens is so-equipped though it won't hurt to leave it on. On the camera, set your exposure mode to Av, ISO to 100 and - very important - set the aperture to a very narrow - at least to f/22. You likely won't see even large pieces of dust when shooting at very wide apertures, so be sure to choose a narrow one. Take the test picture.
 
If your sensor is dirty, you will see spots in your test image. They are especially easy to see if you load the test shot into your computer and increase the contrast. I find that reviewing the test shot on my LCD is faster and works just fine. Zoom into 2 or 3 levels short of max LCD zoom and pan through the image systematically looking for spots. Remember, the location of the dust on the sensor will be exactly opposite of where it appears in the image on the LCD (the lens flips the image, the camera de-flips it for viewing). When you turn the camera 180 degrees to look into the chamber, the spot will now be flipped up/down only.
 
I don't worry about a small sensor dust particle or two (or possibly 3 ...), but anything significant causes me to take action.
 
Canon will provide sensor cleaning service for you (which is the only "official" recommendation I can give) or you can do it yourself. The last sensor I had cleaned by Canon was returned dirtier than it was before I sent it to them. And I can't wait for a camera to ship to/from Canon every time I need my sensor cleaned, so I, like most other photographers have embraced the alternative - Do-it-yourself sensor cleaning. Before I go any further, I must make the DISCLAIMER: I have not seen Canon recommend any do-it-yourself sensor cleaning method other than the Giottos Rocket Air Blower non-contact method (in the Canon section of PhotoWorkshop). You are accepting complete liability for any damage you cause by using any of the methods described here. My opinion is and my experience shows that fear is not necessary - but some patience and carefulness are important. And though we call it "sensor cleaning", we are actually cleaning the low-pass filter that sits on top of the sensor. You need to read this entire page before proceeding.
 
There are many sensor cleaning methods - and I find that several different ones are needed at various times. I start with the easiest and least intrusive cleaning method and move down my list until I have a clean sensor.
 
At this point, you need a well-charged battery in the camera - If the battery dies while you are accessing the sensor, the shutter and/or mirror could be damaged. The camera will likely not permit access to the sensor if the battery is not adequately charged. You should also find a clean, well-lit work area. Since the camera sensor will be completely exposed, you need to avoid dust floating onto it. I generally use the counter in my kitchen or bathroom - with no windows open.

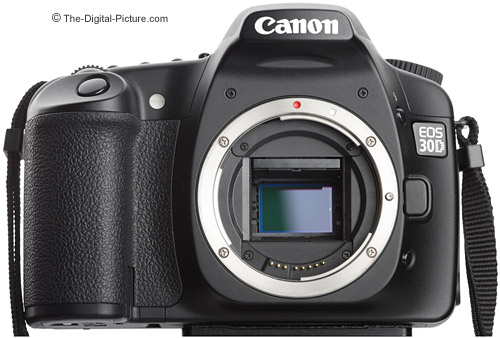
Canon Digital SLR Camera Sensor

To clean the sensor, you need to gain access to the sensor - seen exposed in the photo above. Your manual will give you instructions for doing this, but I'll give you some as well ...
 
There is generally a menu option entitle "Clean Sensor" on the camera. Find it, select it and affirmatively answer the prompt asking if you really want to do this. If you hear the mirror lock up, your camera is ready - otherwise your camera requires the shutter release to now be pressed to yield access to the sensor. Your sensor is now exposed behind your lens.
 
We are going to remove the lens next, although you could easily have done this first. I remove the lens prior to opening the sensor up for cleaning when I want to clean above the mirror. I infrequently clean this area using gentle squeezes from a Giottos Rocket Air Blower. Blowing dust in this area can push it into the viewfinder - take warning of this.
 
Angle the camera body downward and remove the lens, quickly covering the rear lens element to prevent dust from landing there. I simply put a rear dust cap on the lens. The lens-less camera is angled downward at all times unless I am actively cleaning the sensor. The downward angle uses gravity to our advantage - it prevents additional dust from landing inside.

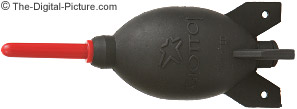
Rocket Air Blower

My first sensor cleaning step is a non-contact one - the one that Canon specifically recommends - blowing air onto the sensor from a Giottos Rocket Air Blower. The risk of damage from this method is light - but the cleaning power is also light. The potential for the blower to remove a piece of grit that might later scratch the sensor during a contact cleaning method makes this step important. While holding the camera in my one hand - still pointing downward, I firmly squeeze the air blower which is carefully positioned near the camera sensor. This air blower fills from its base and expels the air from the nozzle - It does not directly blow the same dirty air back onto the sensor. Be careful not touch the sensor or other fragile parts nearby (like the shutter) with the tip of the air blower. I typically use 8 or ten good air bursts.

Between each cleaning method attempt, another sensor test is needed to find out if the process can be ended at this point - or an additional cleaning method employed. Turn the camera's power off to end the sensor cleaning, remount the lens and run another test. The sample above shows a sample picture from a Canon EOS 30D with a very-dirty sensor. Move your mouse over the sample image to see the blower-achieved results. If you are satisfied, you are done. Otherwise, read on ...

Sensor Brush

If I do not have a satisfactorily clean sensor after using the air blower, I usually move on to a sensor brush. The sensor brush is more capable of cleaning than the air blower alone, but it still presents a relatively low risk of damage to the sensor - IF you keep the brush clean. I am currently using a Visible Dust Sensor Brush but I understand some of the other sensor brushes work well also. The Copper Hills Images Sensor Sweep II looks good to me as well - and it is far less expensive.
 
Visible Dust recommends statically charging the bristles - with compressed air for the model I have. I simply use a series of quick bursts of air across the bristles from my air blower - this seems to sufficiently clean and somewhat charge the brush, but I'm sure compressed air would work even better. Visible Dust makes many variations of their sensor brush including some with battery-powered spinners (Arctic Butterfly) for cleaning/charging the brush. Just like when using the air blower, I hold the camera angled lens mount-downward for the brush cleaning - taking advantage of gravity. Good lighting aids in this operation.
 
Start at one side of the sensor and smoothly progress to the other side - being careful to not get the brush against any other part of the camera. I clean/charge the brush after each pass and make 6 or 8 passes per cleaning attempt. I follow up the brush cleaning with some bursts of air from the air blower - just like in the previous step. Turn the camera's power off to end the sensor cleaning and remount the lens as soon as possible to prevent additional dust from entering the camera. Store the brush clean in a protective case/bag. These first two cleaning methods (blower and brush) can also particles that may scratch the sensor during heavier contact cleaning methods later.

A dust test comes after every cleaning attempt. And as always, if the sensor is satisfactorily clean, the project is over. Sometimes it is, sometimes it is not. The above image shows the before and after (hover mouse over image) sensor dust sample images. The test shows that I have at least one spot remaining (bottom-left)- and there are more not as visible in this downsized image.

SensorKlear

If still not clean, I next use a SensorKlear pen from LensPen (or one of the other brand names it is manufactured under). This is a small, inexpensive and easy-to-use pen-shaped device with a shaped cleaning head that is not wet and does not dry out. The SensorKlear has a brush, but it is not recommended for the sensor (why not make the brush a sensor brush? I don't know ...) I simply rub the cleaning tip in a back and forth pattern over the sensor. You may need to do this a couple of times. I typically place the camera lens-mount-up on a safe, non-marring clean surface under very good light when using the SensorKlear. I can sometimes see the dirt on the sensor this way and can attack it directly using the SensorKlear. As usual, I use the air blower after cleaning with the SensorKlear and then promptly power-off the camera to close the mirror and shutter. Install the lens and test again. Another mouse-over image - looks clean to me.

If the sensor is still dirty, my last method of attack is the wet method - meaning I am going to use a liquid cleaner on the sensor. Wet swabbing the sensor is the most intrusive cleaning method but it is also the most powerful. At this point in my sensor cleaning career, I am using little cooking spatulas modified to fit the sensor size I am cleaning (see pic below) with 1/4 of a Photographic Solutions Pec Pad Wipe taped to them (commonly referred to as the Copper Hill Method). What I think would work best are the ready-to-use Sensor Swabs by Photographic Solutions and Visible Dust but I have not tried them yet. These swabs are rather expensive, but I think they are probably worth their price since I don't wet-clean very often.
 
I doubt you will find many recommending that the Pec Pad be cut into 4, but I find the smaller amount of material is easier to get in and out of the sensor chamber. And I haven't had a problem with the cuts causing loose fibers. Actually, having less material has caused fewer fiber to get loose in the sensor chamber as the pad is less likely to catch the sides of the chamber. You really do need to avoid touching the sides of the sensor chamber with any part of the swipe as the rough, non-glare sides are good at pulling fibers loose. Saving money is not an issue because the Pec Pads are cheap to begin with.
 
I simply wrap the 1/4 Pec Pad over the end of the spatula swab and wrap the sides that extend past the swab around the sides - making sure the end of the swab has a smooth swiping surface. I snugly wrap some thin tape around the pad to hold it in place. I usually setup 2-4 of these in preparation for cleaning and place the clean end so it is suspended in air (such as hanging over the edge of a counter). I make sure the clean end of the pad touches nothing except the cleaning solution and the sensor.

Sensor Swipe - A Modified Cooking Spatula

The "wet" part of this method is Photographic Solutions Eclipse E2 CCD/CMOS Sensor Cleaning Solution or Photographic Solutions Eclipse Optic Lens Cleaning Solution (methanol). Check the individual product reviews to determine which your sensor requires. I apply about two drops of Eclipse solution onto the swipe - one on each end of the tip of the pad.
 
Apply too much solution and you might leave a streak on the sensor (the SensorKlear can remove it). It helps to let the Eclipse solution soak into the Pec Pad or Swab for 10 or 15 seconds, but do not allow it to evaporate as it does so rapidly.
 
As with the SensorKlear method, I place the camera lens-mount-up on a safe, non-marring clean surface under very good light - in a dust-free environment as always. I carefully place the swab into the sensor chamber at a rather hard angle and until it touches one end and side of the sensor. As I swipe in one direction while applying gentle pressure, I reduce the angle of the swab until it is completely vertical at the other end of the sensor.
 
Think of reaching far away from you with a broom and sweeping toward yourself. When the broom is farthest away, it is at a hard angle. When the broom is at your feet, it is vertical. Once vertical at the other end of the sensor, I slide the swab to the other side of the sensor without lifting the swab. I then lift the swab, create a hard angle in the other direction and swipe from the position the swab was lifted from to the other side of the sensor - reducing the angle again until the swab is vertical at the other end of the sensor.
 
The idea behind changing the angle of the swab is to continuously have a fresh part of the pad touching the sensor. This rotating can help lift the dust from the sensor surface - and may prevent a piece of grit from causing a scratch. I discard the used Pec Pad after each set of swipes - they are so cheap (especially when you cut them in 4) that it is silly to risk damaging the sensor with a dirty pad. I usually perform at least two sets of swipes during each cleaning attempt.
 
As always, I blow the chamber with the air blower and retest. If the sensor is still dirty, I usually repeat the wet cleaning until I'm satisfied. I may use the SensorKlear again as well.
 
When the sensor cleaning is finished, clean up and reset your camera to your normal settings. Be sure to set focus to AF.
 
 
Be careful, relaxed and patient while cleaning your sensor, you will do a better job. Relaxing will become easier after you become familiar with sensor sensor cleaning. Lots of additional online resources for sensor cleaning online. What I've outlined is what works for me.
 
 
So how do we keep dust off of the sensor in the first place? Well, you may not be able to prevent it - DSLRs often have with dirty sensors right out of the box. But aside from that, a little care can minimally prolong a necessary sensor cleaning. I change lenses a great deal and generally need to clean my sensor every 5-10 weeks.
 
Probably the most significant dust-prevention you can do is to change lenses quickly (but still carefully) in a dust-free environment. On a windy day outdoors, the amount of airborne dust is extremely high. Similarly, keep the rear lens element clean - use your Rocket Air Blower before installing a lens if necessary. Keep the camera body and exposed lens element pointing down as much as possible when their caps are not on. Misaligned lens and body caps can cause a small amount of material to be shaved off - align them carefully.
 
I mentioned before that there is a lot of sensor cleaning information available online. I'll leave you with some additional resources ...
 
Demystifying D-SLR Sensor Cleaning (CleaningDigitalCameras.com)
Cleaning You Sensor (ByThom.com)
CCD/CMOS Cleaning (Copper Hill Images)
The Pixel Sweeper (Prime-Junta.net)
Understanding Digital SLR Sensor Cleaning (Luminous-Landscape.com)
Cleaning The D-SLR Sensor; Commercial Products For Use At Home Or On The Road

SOURCE

technorati tags:, , , , ,

Shooting Infrared with Digital Cameras

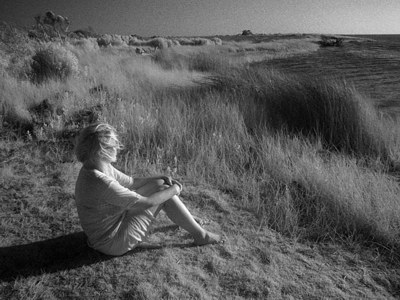
Near Hanksville, Utah, taken during one of my workshops. D1x, Nikkor 20mm f/2.8 with Hoya 72 infrared filter. 5 second exposure (which generated noise in the dark areas). Brought into Photoshop, curves applied, slightly sharpened, then a more patterned noise added using Texture.

Infrared is a spectrum of light beyond that which we normally see. Despite having an IR blocking filter installed between the lens and the CCD, most digital cameras still react to infrared energy, though at levels far lower than visible light. To take “infrared” pictures—i.e., photos primarily made up of near infrared energy—you need to filter out the visible light and only allow the infrared spectrum through to the lens. The easiest way to do this is to use a Wratten filter, which you can find at most professional camera shops (see sidebar at right).

The Wratten series (and other dedicated infrared filters) are very dense filters, nearly opaque. Because they block most of the light, you’ll need very long exposures, so you’ll want to use a tripod.

Generally you should set your camera to B&W mode, as infrared filters remove most of the usable color information (it is amusing to bring a color infrared image into Photoshop and run Auto Levels on it, however). Also, note that incandescent lamps don’t put out much infrared (heat is thermal energy, not infrared), so you’ll probably want to start your experiments with landscapes. One other problem you’ll discover is that once you filter all the visible light, exposure times will be quite long. On a Coolpix 950 I get 1/2 second exposures or longer, while on my D1x I find my exposures are often measured in seconds.

Here’s one set of steps to try:

  1. Focus. Once the filter is on, you won't be seeing much of anything until after the exposure, so focus is your first priority. Infrared light focuses at a slightly different point than visible light, so make sure that you use an aperture in Step 6 that has a decent depth of field.
  2. Place the infrared filter in front of the lens.
  3. Set the camera to manual exposure mode. I've found that the meter in most Nikon cameras, at best, does only a fair job of infrared exposures. On a D1, I almost always have to set exposure manually to get the proper exposure.
  4. Set the camera to shoot B&W only. Optional: you can perform this step later; but it's easier to evaluate exposure with the camera set to B&W if that's how you'll print the image.
  5. Set the camera to a higher ISO rating than usual. I usually set ISO 400 on my D1x. You'll be balancing ISO-generated noise with long shutter speed generated noise. On a D1, try to keep your exposures under 5 seconds; on a Coolpix, try to keep them under 2 seconds.
  6. Set the exposure. Take a test exposure and examine the histogram. Since you're usually printing the final image in black and white you'll need a wide histogram that ranges from nearly pure blacks to nearly pure whites. Be careful at the bright end, however--foliage has a tendency to go to white in infrared, and you must retain enough working room to keep detail (e.g., don't let the histogram extend off the right side!). Adjust your exposure until you've got the broadest, workable histogram.
  7. Take your shot!

Once you’ve taken an infrared shot, you’ll probably want to manipulate it a bit to make it better emulate the look of infrared film, which has unusual "color" (white foliage, for example) and a bit of graininess and bloom to edges. With Photoshop, try the following:

  1. Remove the color, if any. If you’re working with a color image, select Desaturate from the Adjust submenu on the Image menu. Alternatively, you can also choose Grayscale from the Mode submenu on the Image menu, but this doesn't generate the best results.
  2. Balance the image levels. The picture directly from your camera may look strange, as, despite your exposure efforts, it may still have most of the image data all bunched up at one or both ends of brightness range. Novices: select Auto Levels from the Adjust submenu on the Image menu. If you’re an advanced Photoshop user and want to preserve image data and get finer control, select Curves instead of Auto Levels, and adjust manually.
  3. Sharpen the edges. The results so far will probably be a bit soft, so select Unsharp Mask from the Filter menu. Try starting at values of 100 for Amount, 2 for Radius, and 1 for Threshold, and then tweak as desired. Better still: use the Smart-Edge technique I describe in my Sharpening article.
  4. Make it look grainy. Traditional infrared film is sharp, but grainy. To add grain, choose Add Noise from the Noise submenu on the Filter menu. Start with values of 20% and Uniform and tweak as desired. Alternatively, select Grain from the Texture submenu on the Filter menu. Start with values of Soft, 15% Intensity, and 50% Contrast and tweak as desired.
  5. Add edge glow. Traditional black and white film tends to have an unnatural glow around edges, especially bright ones. Select Diffuse Glow from the Distort submenu on the Filter menu. Start with values of 6 for Graininess, 5 for Glow Amount, and 20 for Clear Amount.
Tip: Try these Photoshop steps with a regular, non-infrared image. You might be surprised by the results! (hint: before converting the image to black and white, try modifying the color channels individually, by lightening the red channel and darkening the blue.)

SOURCE

technorati tags:, , , , ,

Infrared Photography Tips

Years ago I used to love to shoot Kodak High Speed Infrared Film. You never knew exactly what you would get until after it was processed. But oh, what amazing images could be made! Green foliage glowed white, people's skin could change to an ethereal complexion, and sunny skies could range from jet black to a rich silvery gray.

But exposure and composition was all guesswork. How much IR was in any given light? Your cameras light meter didn't know. Even focus was a guess, as IR light focused at a different point than visible light. And the really effective filters blocked all visible light - a severe handicap for SLR cameras.

All that has changed with the advent of digital cameras. Most have CCDs that are sensitive to the part of the spectrum known as "near infrared". Put a filter in front of their lens that blocks visible light, and the camera will automatically adjust its focus and exposure, showing you the resulting infrared image on your cameras LCD in real time. For those who experimented with infrared films in the past this is nothing short of a miracle.

What's Infrared Light, and Why Do Plants Seem To Glow With It?
Technically, the part of the spectrum that most digital cameras can see is called near infrared. It is composed of the frequencies just below visible red light, starting at a wavelength of around 700nm.

These frequencies often are absorbed or reflected quite differently than visible light. Most noticeable is the way that the internal structure of leaves strongly refracts near IR. The resulting brightness is dependant on the type of leaf and it's health. Other things, such as still water or a deep blue sky will absorb IR, and thus appear very dark. Some animals absorb infrared (reptiles especially), others reflect it.

Can My Camera Do This?
Most CCDs are sensitive to more than the visible light spectrum. This can cause problems with color balance, so manufactures often place a "hot mirror" in front of the CCD to block excessive infrared light. There is a simple way to tell if your digital camera is going to see IR. Just take a TV or VCR infrared remote control and point it directly at your camera. Push a button on it and look on the LCD for a spot of light. You should be able to see the infrared beam from the remote as a point of light. If you do, you will be able to shoot IR images with your camera.

Next, you will need to buy a filter that will block all visible light, but allow infrared radiation to pass. Different filters block varying amounts of shorter wavelength light. In increasing degree of strength are the Wratten #89B, Wratten #88A, Wratten #87, and Wratten #87C filters. I have had great results with an inexpensive 88A filter from Harrison and Harrison (1835 Thunderbolt Drive Unit E, Porterville, CA 93257-9300 phone 559-782-0121)

If your camera has no thread for a screw in filter, you can buy gelatin filters and cut them down to fit over your lens, and tape them in place. I find gelatin filters especially helpful for supplemental lenses like Nikon's fisheye. I just cut a small circle the size of the rear element of the lens, and place it between the camera and fisheye before I screw it in place.

Shooting Technique
When you place a sharp cut IR filter in front of your digital camera's lens, you are granted entry to an invisible world. Surreal landscapes unfold with unexpected graphic elements, such as inky black skies or open luminous shadow areas.

To compose really strong images in this netherworld requires close examination of your cameras LCD. This presents a problem since LCD screens are very hard to see in bright outdoor light. One solution is to use a LCD screen hood and magnifier like the Xtend-a-View™ (www.photosolve.com). This clever device fits over your camera's LCD, blocking all extraneous light, and magnifies your screen by a factor of 2x. Or just use a camera with an electronic viewfinder, like the Canon Pro90 IS or the Sony DSC-F707 Cyber-shot.

When I go looking for infrared images, I'll often walk with one eye to the LCD viewfinder and the other open to see what's around me. I shoot lots of images, as there are no expensive film and processing costs to deal with.

Depending on your cameras sensitivity, exposures can be fairly long, even in direct sun. The Nikon Coolpix 990 may need up to an 8 second exposure. I usually shoot at around 1/15 of a second with the more sensitive Coolpix 950, and 1/8 of a second with the Canon Pro90 IS. If your camera allows you to increase the apparent ISO, that will help a bit. Features such as the Coolpix's "Best Shot Selector" or the Canon Pro 90 IS's internal Image Stabilizer really help with long exposures. Each is so effective that I find I rarely need a tripod.

A tripod can be very useful, however, as it will allow you capture intriguing pairs of color and infrared images. Just shoot with the filter, then remove it and take a second shot. The two images will be in perfect register, and will allow you to experiment with mixing colors with your infrared later in a program like Photoshop or Paint Shop Pro.

Choosing your Subjects
Plants are quite spectacular in the way they glow. Healthy leaves can go almost white, while dead and dying vegetation is often quite a bit darker. The bark of trees can range from black to a birch like white.

People's skin can glow with a soft light, and occasionally a latticework of small veins can be seen just beneath the surface. Eyes can be quite spooky, as the iris can absorb or transmit infrared in unexpected ways.

Bodies of water can reflect IR if the surface is in motion, but will tend to absorb it if it is still. Shallow water is often quite transparent.

The sky will range from a light gray to black, depending on the angle you are shooting relative to the sun, and the amount of moisture causing backscatter. Clouds are often brilliant white, becoming strong visual elements.

Cityscapes can be richly varied, as buildings reflect and absorb different amounts of IR, and overall image clarity is often dramatic, as atmospheric scattering of near IR wavelengths is generally quite low.

Post Processing the Image
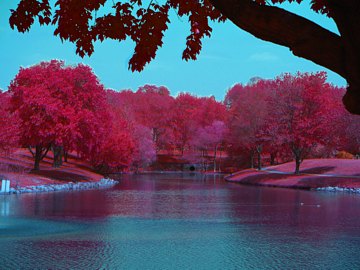
Your infrared images may have some strange color and tonal balance to them right out of the camera. Some may go quite red; others may have a cyan sheen. Rarely will they have a full tonal range.

Using a program like Photoshop will allow you to clean up the image, adjusting curves and levels. I like to convert my RGB images into true grayscale before I print them. Sometimes I'll simply desaturate the image, other times I find there is less noise in the image if I converted to LAB mode first, choose the lightness channel, and then convert to grayscale.

Photoshop also provides the means to produce other classic infrared film effects. Kodak High Speed Infrared Film was quite grainy, and had no anti-halation backing. This caused the highlights to flare and glow with a soft, dreamlike effect. You can add both these effects to your digital images using Photoshop's Diffuse Glow filter.

Printing Your Images
Inkjet printers can do a marvelous job of creating black and white prints. I've been blown away with the new Canon S800, a six-color printer that uses individual ink cartridges. My black and white infrared prints have rich, deep blacks, and sparking highlights. With a simple color adjustment I can print sepia tones, or neutral toned prints.

For anyone who has experimented with infrared film, shooting digital infrared will seem like a dream come true. Being able to preview the results in real time is critical to composing the most effective images. For wedding photographers thinking of offering IR shots as an added feature, digital allows instant results as well as the ability to shoot color with the simple change of filter.

SOURCE

Infrared Photography with a Digital Camera

It was more than thirty years ago when I last experimented with photography in infrared. Too much hassle: special film handling, black-and-white processing, inability to evaluate results (and adjust settings) until the whole roll was exposed and pictures were printed...

Now this has changed. Due to the arrival of digital photography, we can take infrared pictures whenever we please, mixing them with "normal" ones, and see results on the spot, tweaking the settings to our hearts' desires...

All depends, of course, on how your camera sensor array reacts to the infrared — and, depending on the filter you are using, to the far red end of the visible spectrum.


Olympus C-5060WZ, Hoya R72 filter

What's so different about infrared?

At the first glance, a monochrome picture taken in infrared may look similar to just another black and white photograph. And then you start seeing differences: objects which are bright in visible light (like sky) look dark here, while some of those which are "normally" dark (green foliage) acquire a bright glow. An unusual and eerie feeling.

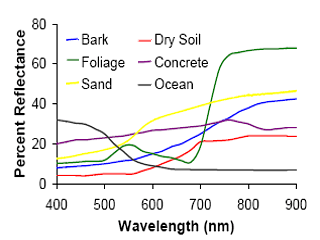
This can be explained with the graph at the right, showing the fraction of light reflected off various materials at various light colors (wavelengths). The height of the curves to the left of 600 nm shows how bright these materials are in visible light; to the right of 700 nm — how bright they are in infrared.

The most dramatic difference between the visible and infrared spectrum is in case of foliage: it does, indeed, become very bright in infrared; very much like you can see in my photographs shown here.

(Source: Kevin Frankel at al., Concealment Of The Warfighter’s Equipment Through Enhanced Polymer Technology, 24th Army Science Conference Proceedings, Orlando, FL, 2004)

To answer the question briefly: photographs in infrared show quite unusual tonality, different than that to which we are used, and this may make them esthetically pleasing, at least in many cases. Which, of course, is a matter of taste.

The camera

First, you need a digital camera. Digital cameras have a special infrared-blocking filter in front of the light-sensitive CCD array, as the IR light degrades the visible-light color rendition (the CCD itself reacts to wavelengths up to 1000 nanometers and even longer). The question is how much of infrared will the filter let through.

Some of the early models, like the venerable Olympus C-2000Z/C-2020Z (but not the '2040!) and Nikon 950, were quite permissive here, but the more recent models let just enough of IR light through to be suitable for infrared photography; most of these, while requiring quite long exposures, also offer a workable solution. Remember, camera makers do everything to stop the infrared from reaching the sensor!

For example, using the Hoya R72 IR filter (perhaps the most useful kind) on a present-day Olympus E-500 requires exposure adjustment by about 11 EV (F-stops), or by a factor of 1500 to 3000 (1 EV corresponds to doubling or halving the amount of light). As a matter of fact, I would classify all digital cameras I have used in the last five years as barely usable for infrared shooting — which does not preclude getting very nice results from them anyway. For comparison, the C-2000Z needed only a 7 EV (130×) adjustment, being about 15 times more sensitive.

For illustration purposes, here is a brief comparison of IR sensitivity for some Olympus cameras I have used in the last few years to shoot in infrared. All data is shown for the Hoya R72 filter, sunny daylight; the values are accurate to 0.5 EV or better. The Typical Exposure data corresponds to a sunny day outdoors, ISO 100.

Camera  C-5050Z   C-5060WZ     E-10       E-20      E-300     E-500  
Exposure Factor 11.5 EV (3000×) 7.3 EV (150×) 10.3 EV (1300×)
Typical Exposure 2 seconds at F/4 1/8 s at F/4 1 s at F/4

For other cameras, check for yourself before investing into any filters. You may also find data on selected models at Jen Roesner's site.

A few of the Sony models (Sony DSC-F707/717/818 in this number) allow you to move the anti-IR filter out of the light's way; unfortunately, Sony went to great measures to make this feature unusable in daylight, as it is supposedly making some clothing partially transparent to infrared. (I would also like to turn Sony's attention that the big lens in the '717 can be used to hurt babies and puppies.)

Some people modify their cameras by removing the anti-IR filter (sometimes replacing it with a glass plate of equal thickness). This is a tricky operation, but it will usually increase the camera's IR sensitivity dramatically. Obviously, the camera's color performance in visible light will be degraded, and your warranty will be voided.

SLR — the second choice

Digital SLRs are not my first choice for infrared, for a two major reasons.

First, this class of cameras (with a few exceptions, see below) does not offer real-time electronic preview, because the light from the lens reaches the sensor only during the actual exposure. This means that you have to put the camera on a tripod, compose the picture without the IR filter, then put it on and shoot blind.

Two notable exceptions are the older Olympus E-10 and E-20 SLRs which use a beam-splitting prism and allow for real-time preview, and the more recent Olympus (again!) models, with the Live View feature: the E-330, E-410, and E-510.

Second, the light metering in digital SLRs is not done by the image sensor itself (like in non-SLR models), but by a separate set of sensors, which may have a different response to infrared. You cannot rely on camera's autoexposure (although you may be able to work out a correction applicable to a given camera/filter combination).

This is why for infrared I prefer optical finder, non-SLR cameras, like the C-5050Z or C-5060WZ (or the two-of-a-kind E-10/E-20 as mentioned above).

A hardcore infrared aficionado may decide to splurge $1800 to get the Fuji S3 Pro UVIR. This is a modification of the "regular" S3 Pro, intended for photography in the infrared or ultraviolet part of the spectrum. In this model, the anti-IR filter (also blocking UV light) in front of the CCD has been replaced with a plain glass plate, so that the overall infrared sensitivity is vastly increased. The camera also allows for live digital preview of the image, very much like in the Olympus Mode B (see the section on image preview below), but limited to 30 seconds.

I've never used the S3 (modified or not), so I will not go into details; besides, if you are interested in it, you probably know more about infrared photography than I do. In any case, I wasn't able to find any infrared samples from this camera on the Web, so I do not think it is much used outside of scientific and law-enforcement applications.

The IR filter

Then you need an infrared filter. You can buy these from any dependable mail-order supplier, like B&H Photo.

Various filters may differ in the visible light cut-off point (see the table below). The Wratten #89B (available as Hoya R72), with the light transmission falling down to 50% at 720 nanometers, seems to be most popular and gives the greatest chance of success. The darker #87 or #87C may or may not work, depending on the camera, while the almost-IR #70, while allowing for shorter exposure times, does not provide the eerie Woods effect on greens.

You also need a way to attach the filter to your lens. This is easy with SLR and digital-finder models, but digital compacts may pose a problem. WIth very few (like the Olympus C-5060WZ) you can do it directly, as the lens is threaded; with others (actually, all other compacts on the market) you will need a lens adapter tube, like the 41-43 mm CLA-1 attachment for the Olympus C-5050Z (plus a step-up ring).

A tripod is essential. For the #89B (R72) filter you will be getting exposures of 1-2 seconds or more at F/4 and ISO 100.


Olympus E-20, Hoya R72

Olympus E-20, Hoya R72

IR filter summary

Here is a brief comparison of the infrared filters, including those made by B+W, Hoya, and Tiffen as of November, 2004, Those generally available in glass (as I've checked at B&H in November, 2004) are marked in bold. Some are available as gelatine foil only.

The filters are listed in order of increasing "blindness" to the visible light. The "0%" column shows the wavelength below which the filter has zero transmittance (i.e., lets no light through), while "50%" — the wavelength at which the filter blocks half of the incoming light (50% transmittance).

Wratten Schott B+W Hoya Tiffen 0% 50% Remarks
#25 OG590 090 25A 25 580 nm 600 nm Really a red filter
#29 RG630 091 - 29 600 nm 620 nm Dark red
#70 RG665 - - - 640 nm 680 nm Very dark red
#89B RG695 092 R72 - 680 nm 720 nm Almost "black", but not quite
#88A RG715 - - - 720 nm 750 nm I've never seen this one
#87 RG780 - - 87 740 nm 795 nm Cuts off all visible light
#87C RG830 093 - - 790 nm 850 nm Usually called "black"
#87B RG850 - RM90 - 820 nm 930 nm Expensive! $250 & up!
#87A RG1000 094 RM100 - 880 nm 1050nm Blocks even some of infrared

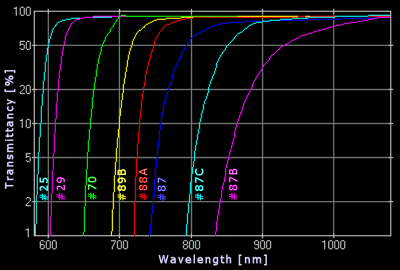
The data above is quoted after W.J. Markerink. For those who would like to have a closer look at IR filter transmittance, here is a graphic representation:

The graph shows the transmittance of various filters as a function of the wavelength. It is based on data by Paul Repacholi (Curtin University of Technology, 1992), posted by W.J. Markerink and also by Eric Cheng.

The logarithmic scale is used here, as it fits the problem better: differences, say, between 1% and 10% are by far more meaningful than those between 91% and 100%.

It can be clearly seen that #89B (R72) still allows through some of the far red (just below and around 700 nm), #87 starts only around 740 nm.

Just a reminder: the human eye is sensitive to wavelengths up to 700-720 nm or so.

Because the anti-IR filters in digital cameras block most of the infrared, even slight differences in filter transmittance may have strong effect on results (and exposure). Therefore two filters listed as equivalent in the table above may deliver slightly different results on a given camera.

Recommendation: I believe the most useful, general-purpose IR filter for digital photography is Hoya R72 (#89B). It blocks visible light well enough (if not entirely) to provide a well-pronounced IR effect, while still allowing for non-exotic exposure times. This filter should work fine with most of mid- to high-end amateur digital cameras (your mileage may vary, so check with someone who tried it on your camera). The small amount of visible (far red) light which this filter lets through does not affect pictures enough to spoil the IR effect, while coloring your images red (or purple), therefore they need to be converted to monochrome in postprocessing.

The #87 filter is more expensive and more tricky. Many digital cameras will not be able to "see" through it, while some others may work — again, check with their users. I have tried it with the Olympus E-300: the exposures are much longer

Image preview

As mentioned in the SLR section above, most of digital SLRs do not allow you to use the LCD monitor for picture preview and composition. You have to compose in the optical finder without the filter (using a tripod, of course), then put the filter on the lens, and shoot blind. If you have a digital SLR and intend working in infrared, you may be better off getting an inexpensive non-SLR model specifically for infrared. You need a small backup camera anyway.

Digital non-SLR cameras (including EVF ones) are more convenient in this aspect, as you can view and compose the image on the monitor as normal; the preview will be red or purple, of course, and quite dark, but usable for these purposes.

As mentioned before, the E-330, E-410, and E-510 from Olympus do not suffer from this: their Live View feature allows for electronoc image preview with the filter on.

Exposure setting

All digital cameras I know measure the light through the lens: most non-SLRs use the CCD itself to do that, while SLRs (except for the E-10/E-20, again) have dedicated metering sensors for which some of the light used for viewing is diverted.

This means that you can, with most cameras art least, trust the exposure automation — as long as the metering system is capable of doing its job at the very low light levels. It should be: a typical IR exposure with the R72 filter corresponds to exposure value of EV 3, while most cameras can cope with EV zero or close.

This is especially applicable to non-SLR cameras, using the CCD for metering, as already mentioned. Still, even with these cameras usually you will have to apply some exposure compensation, usually -0.7 or -1 EV, for the reasons described below.

In SLRs, a separate light sensor does the metering; its sensitivity to the IR may be entirely different than that of the CCD imager; therefore you may have to apply a significant exposure compensation to get things right. A few test shots should be enough to establish the value appropriate for a particular camera. For example, I can reliably shoot IR with the Olympus E-300 in the autoexposure mode, but I have to apply a +4 EV compensation.

When setting the exposure compensation (SLR or not), you have to aim for a picture which will look like it is underexposed, too dark. This is because practically whole image information goes into just one of the RGB components: red, and you have to keep that component from saturation (i.e., running out of range). If your camera can display a brightness histogram for individual RGB components, make sure that the red one does not hit the upper limit.

Your exposures will be quite long: an IR filter combined with the camera's anti-IR one will let through less than 0.1% of the incoming light. A bright scene, requiring 1/500 s at F/8 in visible light will need about 1 s or longer at F/4 on most cameras. Not only this asks for using a tripod, but, if the air is not quite still, there will be a blur in the foliage, grass, water reflections, etc. This is not necessarily a bad thing, and it may add an extra feel to the image.

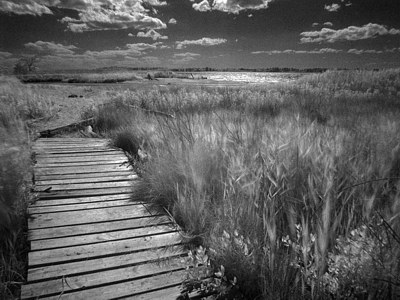
Here is an example. I like the contrast between the sharp (immobile) planks, and the fluid, fuzzy grass. A matter of taste, of course, but it was quite windy that day.

Olympus E-500, Hoya R72 (XGA here)

Fogging

Certain camera models (SLR or not) may exhibit some fogging, or image areas with extra exposure (for example, a bright central spot some Canon Digital Rebels). This may be due to light scattered from inner surfaces of the camera body and/or lens; perhaps the black coating of those is not black enough in infrared?

Sometimes it happens to all cameras of a given model, sometimes — just to a particular specimen or a particular lens. Camera makers are not worried about this: very few users ever venture into the IR realm, and this is a mass market after all. There is no way to avoid this problem; once again, check an IR filter on your camera before buying.

Note to SLR users: regardless of that effect, the image may be fogged, or otherwise affected, by the light entering through the viewfinder in spite of the raised mirror) and reaching the sensor after being scattered around the mirror chamber. To avoid that, close the eyepiece shutter before the exposure, or use the included eyepiece cover (or, at the very least, shield the eyepiece with your hand or hat). Users of non-SLR cameras, obviously, do not have to worry about this.

Focusing

The focal length of your lens (and therefore the proper focus setting) depends on the wavelength. Lens makers try to keep that dependency to a minimum (achromatic lenses), but only within the visible light spectrum. As soon as you are into infrared, the chromatic aberration curves go astray.

Because autofocusing in most digital cameras is done through the lens, the focus shift is automatically taken care of. Therefore it may be safer to let the camera focus — as long as it is capable of doing that at low light levels (down to EV 0, as usually quoted for an F/2 lens). Most cameras are, but not very reliably, so I would recommend taking more than one picture, every time forcing the camera to re-focus. Doing that, no IR-related corrections to focusing are necessary.

Setting the focus manually may not work any better, as the distance scale corresponds to focusing in visible light. If in doubt, try setting focus a little closer than the actual subject distance: at the equivalent focal length of 50 mm use about 4-5 m instead of infinity — but this actually depends on the particular lens.

My early digital experiments, setting the Olympus E-10 to infinity, resulted in very unsharp pictures. If you want to focus manually, you'll have to do a series of test shots.

Depth of field may, to a large extent, help masking the lack of proper focus. In case of problems, try to use wide zoom settings and shoot in aperture priority at F/8 or so; this may help.

Postprocessing

The response of red, green, and blue photosites in the CCD, and therefore the color image recorded by the camera, is the result of a subtle play between the transmittances of three (!) filter layers involved here: (1) the IR filter mounted on the lens; (2) the anti-IR filter in front of the CCD; (3) the tiny red, green, and blue filters in front of each photosite of the sensor.

No wonder that the (false) colors of an image shot in infrared may vary from one camera model to another, and from filter to filter used.

While some cameras, especially when used with filters darker than #89B, may come up with color images which some may find pleasing, in most cases the images will have a very strong red or purple-red tint, being recorded mostly in the red component. This is certainly true of all Olympus models I have used, but not only. The effect may also depend on the sensor gain (ISO setting) and color balance, but not by much.

Therefore usually you would like to translate your IR pictures into gray scale, i.e., to black-and-white (or sepia) monochrome.

Depending on your postprocessing program, you can do it by desaturating the image, or changing its mode to 16-bit monochrome, or applying a duotone filter.

After the conversion you will usually want to restore the tonal range of your picture (doing that before does not make much sense, as this usually leads to overloading of the red channel and burning out the highlights). Then, after denoising (see below) and, if needed, some sharpening, you may tint your monochrome picture to sepia or something else, although I usually prefer my IR pictures straight black-and-white.

Retaining some color information

Your infrared images do not have to be monochromatic (like black/white or sepia). There is some color information in the image file, and while it has nothing to do with reality, it may be used to generate quite pleasing images. The easiest way to do that is to split your image into individual RGB components, adjust each separately, and then recombine them.

Here is an example of such a treatment, borrowed from my C-5060WZ infrared sample page, where you may find more details on how the image was postprocessed.


Olympus C-5060WZ, Hoya R72

Another field for experimentation opens itself if you have two versions of the same image (identically framed): one shot with, and one without an IR filter. Bringing both into an image editor, splitting them into R, G, and B layers, and then recombining the R layer from the IR image with G and B (possibly swapped) from the visible-light one gives efefct which is sometimes compared to that of the Ektachrome false-color IR film. Some tonal adjustment of individual layers before recombining them may improve the effect.


The red layer from an IR image combined with green and blue ones from a visible-light picture.
Frankly speaking, this is too intrusive for my taste, and the effects will be eye-pleasing for very few subjects. The example I'm showing at the left is just plain ugly. You may have more luck (or skills).

In general, I prefer my infrared pictures to be monochrome, sometimes tinted just a bit towards warmer shades.

Image noise

Infrared images exhibit more noise than visible-light ones. First of all, the exposures are 1000 times or so longer than in "normal" pictures, and that's when the noise always shows up.

Another factor is that the image is created mostly in the red component, i.e., using only the R (red-sensitive) photosites of the image sensor. In the most commonly used Bayer matrix arrangement, out of each four photosites (sometimes wrongly referred to as pixels in this context) one records red, one blue, and two — green component of the image. Only when the raw image is being converted to RGB, the missing values are interpolated, so that a pixel (all three components) is created for each photosite location. This means that your eight-megapixel camera records just two megapixels of information, plain and clear; for the R and G photosites the whole signal is just interpolated from their R neighbors. The photosite size, however, remains still at the 8 MP level, just 25% of what it would be for a 2 MP sensor of the same physical size.

Last but not least, the image has to be kept within just a partial luminance range (read: dark), to avoid overloading the red channel, as I already described above. For a more natural look this limited tonal range will have to be, after desaturation, stretched to the full luminance range. This leads to (usually) doubling of the visible noise amplitude.

One may argue that the last two effects partially overlap, i.e., I am listing the same thing twice, but still — the noise is there, much more of it than in visible-light images, be it color or monochrome.

Some photographers (especially those who never printed anything above 4x6" from their film cameras) are allergic to noise in digital images. Others, however, are so used to the large grain in infrared films, that they consider the noise a part of the "infrared look" and want to emulate the effect in the digital medium.

If you dislike noise in your IR images, tough: it will be there. You will have much more of it than in "regular" color pictures. If you find the noise objectionable, try to keep it down by using the lowest ISO setting of your camera and opening the aperture as wide as your lens allows (this will, however, reduce the available depth of field, not always desirable, especially in view of possible focusing problems, already discussed).

Remember also that the infrared image should be underexposed only enough to avoid the red channel overload — but not more, as this will result in more noise amplification when the tonal range is restored. If you are not sure, use exposure bracketing until you get the hang of it.

Much of the noise can be removed quite well with use of an image-processing program, or, usually more effectively, with a dedicated noise removal application (or plug-in), like, for example, Neat Image. The latter does a very good job, and has a wide range of available adjustments.

Still, we are walking a tightrope here. While a moderate amount of noise can be often removed quite nicely, quite often I find that really noisy images look better without that operation, which often leads to excessive loss of texture detail and an unnatural, plasticky look. Be careful and keep the originals in case you change your mind later.

Many photographers, to the contrary, like the noise effect, as it is often associated with the "classic", grainy infrared look. Actually, from time to time I'm receiving emails how to bring more noise to infrared images!

To emulate the IR film grain effect, some writers recommend adding artificial noise in postprocessing. I'm not happy with that technique, preferring rather to intensify the natural noise pattern of the CCD. This can be done by setting the CCD sensitivity to the equivalent of ISO 400 (or higher, if your camera allows it). With all cameras I've tried, a one-second exposure at ISO 400 shows more noise than a four-second one at ISO 100, so this will help. As a side effect, it will also reduce the exposure time.

To make the noise more visible, you may also underexpose your pictures by one or two EV, and then stretch the tonal range in postprocessing to recover the shadows and highlights; this will also amplify the noise considerably. This technique takes less time to apply than to describe, see an example below. Just remember that the tonal smoothness of the result may be affected, therefore it may be better to convert your image to 48 bits (16 bit per color), do the processing, and only at the end convert it back to 24 bits. The noise amplitude will remain unaffected by the switch to 48 bits, but the tonality will be smoother.


Olympus E-20 at ISO 320, Hoya R72, underexposed and re-equalized after desaturation

A 1:1 sample from the image at the left

In most of my infrared images, however, I'm happy with the amount of noise as it is, with no need to reduce or to increase it.

Almost infrared: a deep-red filter

The easily available Wratten #29 (B+W #91) deep-red filter will also deliver quite dramatic monochrome effects (although not as strong as these obtained with the #70). But, importantly, with the light loss of only about 8x (3 EV) it can be used safely without a tripod.

One of my Readers reported success using such a filter for IR photography. To get rid of the visible-light component, he would remove the red layer of the RGB image, leaving only the green and blue layers. As these are virtually blind to red, only the IR input would be left.

While this might work with some cameras (he used a non-SLR Nikon), my experiments with the Olympus C-5060WZ ended up with negative results. The green and blue image layers, as dark as they were, did not show any Woods effect. This indicates that their IR sensitivity is even lower than that for the red light. I've tried the same approach with a #70 filter, also to no avail.


Olympus C-3000Z; Wratten #70
A deep-red filter may still provide very nice monochrome images, as long as you do not have to have the Woods effect.

I'm using it from time to time, and the extra advantage is that with the exposure multiplier you can get away shooting from hand. Some examples are shown in my C-3000 almost-IR sample page.

What to shoot in IR

The most rewarding subject to shoot in infrared are sunny outdoors scenes, especially with lots of foliage, grass, and water, preferably with some nice, white clouds in the sky. Morning and evening sunlight is richer in infrared than midday one, so the glowing Woods effect in the foliage will usually be more pronounced.

As always in photography, this, however, is not an iron-clad rule. Sometimes an image shot under a cloudy sky may carry a strong visual message as well. For example, I like the one shown in the preceding section. I shot another frame at the same location on a sunny day, and it was, I would say, more trivial.

Buildings, especially with bright walls, look really good on the background of the dark, almost-black sky. Some people recommend IR for shooting cemeteries, as the subject goes well with the unreal feel of the medium — but, after all, how many cemetery pictures can you take?

Don't limit yourself only to the bright greens and dark sky. Even scenes without those telltales of infrared will have a different tonal gradation than a "normal" picture converted to B&W. Look, for example, at this one.

Looking at this picture (shot at 1/8 s and F/1.8) now, I think I should have closed the aperture down to F/8 in order to have most of the people shown as streaks of movement at the exposure of 2.5 seconds; with some luck I could get one stationary person in the middle, a real keeper. Well, next time.


Olympus C-5050Z; Hoya R72 (XGA here)

The eerie atmosphere of IR pictures goes well with adventurous, off-balance composition. Remember the pictures you were taking as an 18-year old, aspiring photographer? Try that again. (I will, too, try to break that lame habit of neat, even framing, acquired after having grown out of that period.)


Olympus C-5060WZ, Hoya R72 filter

Infrared is not a common medium for people shots, but I have seen some very good IR portraits. Outdoors portraits or nudes with the surrealist background may have a strong impact.

The skin becomes more white, with most imperfections (and texture) gone, which may be related to the partial transparency of its outer layers to the longer wavelengths, and the porcelain-like tonality quite interesting.

Check out, for example one of Eric Cheng's IR galleries (shot with a modified camera, with the IR-blocking filter removed).

Web resources

Back in 2000, when this article was originally posted, there was a scarcity of any IR information on the Web (the first three items on the list below being notable exceptions). With the popularity of digital medium, however, there is more information available now. Here are pieces which attracted my attention.

SOURCE

technorati tags:, , ,

Programul Nikon în prim-plan


La Nikon, toate categoriile de preţ ale SLR-urilor sunt bine reprezentate: cumpărătorul are posibilitatea de a alege între cele şapte modele, cu preţuri cuprinse între 450 şi 4.500 euro, iar oferta de obiective AF şi accesorii e foarte diversificată. În articolul de faţă încercăm să analizăm cât mai complet sistemul de produse SLR de la Nikon.


Treaba merge foarte bine pentru Nikon de când producătorul japonez a început să înregistreze succese pe trei planuri deodată: D2X a câştigat tot mai mult teren în domeniul profesional, D200 în segmentul semiprofesional, fiind cel mai bun aparat foto la clasa sub 2.000 euro. Şi, în final, Nikon a reuşit să-şi croiască drum la categoria sub 1.000 euro prin două modele: D80, un aparat SLR digital de 10 megapixeli, şi D40 – model SLR de bază cu un concept de utilizare inovativ.
Indiferent de clasa de aparate foto din care fac parte, toate modelele de la Nikon au acelaşi lucru în comun: senzorul de imagine de format APS-C cu factorul de unghi vizual 1,5. Astfel, la un obiectiv de 50 mm se îngustează câmpul vizual la nivelul unui obiectiv clasic de 75 mm. Lipsa unui senzor full frame este însă la Nikon o chestiune de optică: dacă ar trece peste 15 megapixeli, un senzor full frame ar avea mai multe rezerve, iar fotografierea ar fi mult uşurată prin focalizarea selectivă şi gradul de detaliu foarte mare în colţuri.

Pe de altă parte însă, senzorul de format mai mic permite construcţia unor obiective mai compacte şi mai rezonabile ca preţ, cu un câmp vizual mai redus faţă de obiectivele pentru full frame (pe film). Nikon are în prezent opt astfel de obiective cu prescurtarea DX în denumirea produsului, aproape toate cu motor ultrasonic (AF-S Nikkor). Această tendinţă de încorporare a motorului ultrasonic în obiectiv e foarte clar scoasă în evidenţă de noul aparat SLR, D40, care este primul model de la Nikon fără motor ultrasonic încorporat. Obiective AF-S compatibile cu fotografia digitală pot fi găsite şi printre tipurile non-DX. Mai multe despre acestea la capitolul obiective din acest articol.

Pentru începători: D40 cu 6 megapixeli
Nikon D40 (600 euro în kit-ul cu obiectiv standard) se prezintă ca fiind noul highlight la clasa de bază. Aparatul are în comun cu D50 (450 euro) şi D70s (600 euro) un RGB-CCD de 6 megapixeli. Şi totuşi, noul aparat are o calitate a imaginii cu mult mai bună: la ISO 100 şi ISO 400 obţine punctajul maxim, 15 puncte, la nivelul de zgomot de imagine, în timp ce D50 trebuie să se mulţumească cu doar 13,5/11 puncte, iar D70s cu 14/11,5 puncte. Observăm o evoluţie şi la contrastul de detaliu, care acum este de 9,5/9 diafragme la ISO 100/400, iar la ISO 800 - 8,5 diafragme. Toate aceste lucruri cântăresc în practică mai mult decât saltul înainte făcut de D70s, la calitatea imaginii la ISO 100.Cu totul nou este conceptul de utilizare al lui D40, Nikon lipsindu-se pentru prima dată la un SLR de cel de-al doilea ecran LCD pentru afişarea parametrilor expunerii. Pentru aceasta se foloseşte de ecranul TFT obişnuit, cunoscut deja de la Canon EOS 400D, Sony Alpha 100 şi de la unele modele Olympus. Display-ul de 2,5 inchi asigură o vizibilitate foarte bună şi permite vizualizarea grafică a unor parametri, cum ar fi diafragma, a cărei deschidere variază odată cu diafragma de lucru efectivă. Accesul la cele mai importante funcţii, cum ar fi sensibilitatea, balansul de alb, rezoluţia, măsurarea expunerii, modul AF, corecţia expunerii şi a bliţului, este asigurat la fel de rapid şi necomplicat prin ecranul LCD. Pentru a ajusta un parametru, se deplasează un marcaj galben cu ajutorul tastelor-săgeţi spre câmpul dorit. Apoi se activează câmpul (la care se şi afişează o imagine demonstrativă), modificaţi parametrul şi confirmaţi. Procedura este logică şi uşor de stăpânit, însă ar putea fi mai rapidă – de exemplu, prin modificarea directă în câmpul marcat cu galben cu ajutorul rotiţei de scroll. Acest lucru este însă posibil cu ajutorul tastei Fn, căreia i se pot atribui până la cinci funcţii diferite. Dacă cele 17 funcţii individuale vi se par derutante, se poate utiliza o selecţie de doar 6 parametri ori se poate configura un meniu individualizat. Atât această opţiune, cât şi meniul „Image edit” au fost implementate în D40 de la D80. Printre funcţiile de prelucrare ar fi interesant de amintit funcţia „D-Lighting” care ajustează în trei trepte contrastul. În loc de un vizor cu prismă ca la D80/D200, în D40 a fost încorporat un vizor cu oglindă cu o reprezentare efectivă a imaginii mai redusă. Faţă de D50/D70s, imaginea din vizorul lui D40 este totuşi ceva mai mare, magnificarea efectivă fiind de 0,54 faţă de 0,48. În schimb, a fost redus sistemul AF, care acum trebuie să se descurce doar cu trei câmpuri dispuse orizontal; D50/D70s aveau la dispoziţie cinci câmpuri. D40 declanşează însă mai rapid: 0,36 secunde întârzierea de declanşare inclusiv AF – o valoare de nivelul unui D80 sau D200. Spre comparaţie, Nikon D50 şi D70s declanşau după 0,48 secunde, respectiv 0,44 secunde. Doar la timpul de pornire, D70s se dovedeşte a fi net mai rapid: 0,2 secunde faţă de 0,6 secunde. Pentru prima dată un SLR digital de la Nikon vine fără motor AF. În ciuda baionetei nemodificate mecanic, D40 poate să folosească doar obiective de tip AF-S şi AF-I cu motor AF integrat, limitând astfel numărul de obiective din gama Nikon la mai puţin de 20 de modele, mai ales că multe dintre obiectivele de la producători terţi sunt incompatibile. În tabelul nostru veţi găsi lângă D40 şi modelele D50 şi D70s, foarte rentabile în prezent. Totuşi, noi vă recomandăm, în ciuda preţului mai ridicat, modelul D40, datorită rezultatelor mai bune la ISO 400, cu excepţia situaţiei în care aveţi deja numeroase obiective Nikkor (în afară de cele AF-S şi AF-I) şi doriţi să le folosiţi în continuare.

Pentru avansaţi: D80/D200 cu 10 megapixeli
Nikon D200 (1.400 euro) punctează ca aparat foto semiprofesional prin dotarea sa de primă clasă şi prin performanţele sale excepţionale: 57,5 puncte (ISO 100), respectiv 54,5 puncte (ISO 400) pentru calitatea imaginii, cele mai bune valori la aparatele din clasa sub 2.000 euro. Aparatul de 10 megapixeli reuşeşte să convingă atât la nivel de zgomot de imagine (15 puncte la ISO 100/400), cât şi la rezoluţie (1173 PL/ÎI la ISO 100). Nici la balansul de alb, fidelitatea de culoare sau la contrastul de obiectiv nu-i putem găsi niciun cusur demn de amintit. În ceea ce priveşte dotarea, nu lipsesc accesorii profesionale cum ar fi de exemplu adaptorul WLAN WT-3 sau posibilitatea de conectare la un receptor GPS pentru salvarea coordonatelor geografice în informaţia fotografiei. Carcasa e construită dintr-un aliaj de magneziu şi este etanşeizată contra prafului şi umezelii. Greutatea sa de 830 g îl face să stea foarte bine în mână, fapt la care contribuie din plin şi cauciucarea mânerului. Graniţa dintre un aparat profesional şi unul pentru amatori dispare la acest model, cu excepţia prezenţei bliţului încorporat. LA fel ca la modelele profesionale de la Nikon, D200 poate fi utilizat împreună cu obiectivele Nikkor AI cu focalizare manuală în programul prioritate de timp. Display-ul TFT de 2,5 inchi are o rezoluţie de 230.000 pixeli şi permite o vizibilitate de până la 170 grade vertical/orizontal. Aparatul foto poate fi reglat după dorinţă prin nu mai puţin de 45 de funcţii individuale, aceste setări putând fi salvate pe patru locuri de salvare. Pentru a uşura utilizarea lor, funcţiile individuale au fost împărţite în şase grupe. Modulul de focalizare automată Multi-CAM 1000 ridică noi ştachete la această clasă de aparate foto. Puteţi reduce numărul total de câmpuri de măsurare, de la 11 la 7 câmpuri mărite, permiţând astfel focalizarea mai uşoară pe subiecţi în mişcare. Câmpurile de măsurare pot fi selectate individual sau în grupe, pentru a putea focaliza confortabil pe porţiunea centrală a subiectului. Întârzierea de declanşare este de 0,36 secunde, D200 fiind întrecut clar de concurentul de la Canon la acest punct, EOS 30D (0,25 secunde). Acumulatorul Li-ION EN-EL3e permite 100 de declanşări cu o singură încărcare, deşi aparatul are un consum foarte ridicat de energie. O caracteristică profesională este punctul din meniu „Battery diagnostic” care afişează starea bateriei, numărul de expuneri (de la ultima încărcare) şi durata de viaţă. Modelul mai ieftin de 10 megapixeli, D80 (870 euro), seamănă la exterior cu modelele D70, însă atinge nivelul lui D200 la calitatea imaginii: 57/55 puncte la ISO 100/400. Senzorul de 23,6 x 15,8 mm produce fotografii de 32,78 x 21,95 cm la 300 dpi, care nu sunt salvate pe carduri CF ca şi la D200, ci pe SD. A fost preluat de la D200 modulul AF Multi-CAM 1000, cu 11 puncte de măsurare. Spre deosebire de D200, la D80 avem mai puţine posibilităţi de influenţare a focalizării automate – de exemplu, selectarea manuală a grupelor de câmpuri de măsurare. În plus, lipsesc diferite rotiţe care la D200 permit accesul direct la diferite moduri de AF sau metode de măsurare a expunerii.Display-ul LCD (iluminat) este mult mai mic decât la D200, iar pentru a compensa acest lucru, nu s-a recurs la reducerea numărului de informaţii, ci s-au micşorat cifrele şi simbolurile. Display-ul TFT este la fel de mare ca la D200, 2,5 inchi, fiind mai mare decât la D50/D70s. Şi la D80 avem acelaşi factor de magnificare a vizorului de 0,6; imaginea din vizor este astfel vizibil mai mare decât cea a multor aparate concurente. Dacă nu vă simţiţi confortabil cu numeroasele opţiuni tipice pentru Nikon, găsiţi în meniul lui D80 la „Menu select” opţiunea „Custom mode”. Aici aveţi acces la fiecare dintre cele cinci submeniuri şi la punctele de meniu aferente. Fiecare punct de meniu poate fi activat sau dezactivat, obţinând astfel un meniu personalizat. Spre deosebire de D200, aici lipseşte meniul „Last settings”. La D80 pot fi prelucrate imaginile deja expuse şi salvate ca noi fişiere. Printre opţiunile de prelucrare se numără corecţia „ochi roşii”, efectele monocromatice (alb-negru, sepia sau tonul albastru), precum şi filtre cum ar fi Skylight sau Warming tone. La balansul de culoare puteţi modifica atmosfera de culoare cu ajutorul unui meniu grafic pe patru axe. Suplimentar, e posibilă decuparea unor porţiuni din imagine sau generarea de imagini micşorate, pentru trimiterea lor prin e-mail. La „Image cut” se pot contopi două imagini RAW într-o dublă expunere. Cu „D-Lighting” se poate efectua reglarea contrastului în trei trepte – zonele de umbră sunt iluminate şi aduse la nivelul luminilor din imagine.

Aparate foto profesionale: D2Xs şi D2Hs
Clasa profesională se defineşte la Nikon nu neapărat prin rezoluţie, ci prin tipul carcasei, identică la modelele D2Xs şi D2Hs, dotate cu grip şi etanşeizate contra prafului şi umezelii. Tipic e şi display-ul TFT de 2,5 inchi, precum şi display-ul LCD care-l completează pe primul şi e dispus în partea superioară a carcasei. Toate elementele de control, cele patru rotiţe, precum şi diversele taste sunt dispuse ergonomic şi permit utilizarea aparatului foto fără a fi nevoie să se recurgă la manual. Altă trăsătură comună: ambele modele utilizează un CMOS pentru compunerea imaginii, şi nu un senzor RGB ca la celelalte SLR-uri digitale din aceeaşi casă. La balansul de alb, aparatele foto lucrează cu trei sisteme de măsurare: un senzor la prismă măsoară temperatura culorii, independent de culorile subiectului (măsurarea luminozităţii), influenţând astfel valorile furnizate de senzorul de imagine şi de măsurarea în matrice 3D, şi în cazul expunerilor cu bliţ. Printr-un emiţător care se montează pe podeaua carcasei, este posibilă transmisia imaginilor de la aparatul foto la o reţea locală (LAN). Cu o rezoluţie nominală de 4 megapixeli, D2Hs (3.100 euro) face o impresie exotică printre celelalte aparate SLR din categoria profesională. Din această cauză, valorile calităţii imaginii se situează cu mult sub nivelul standardului clasei (45,5/43,5 puncte la ISO 100/400). Aparatul foto pentru reportaje e conceput pentru viteză, reuşind să capteze 6,5 cadre pe secundă, putând salva mai mult de 50 de imagini într-o serie. Modelul de top de la Nikon, D2Xs (4.400 euro), reuşeşte să atingă cu un senzor APS-C (23,7 x 15,7 mm) o rezoluţie de 12 megapixeli şi să obţină 62 puncte la calitatea imaginii la ISO 100 /59,5 puncte la ISO 400). La nivelul de zgomot de imagine, D2Xs şi D2Hs ating valori asemănătoare, iar la fidelitatea de culoare şi la contrastul de obiect D2Xs reuşeşte din nou să se distanţeze. Modulul AF lucrează la fel ca la D2Hs cu 11 puncte de măsurare şi nouă senzori în cruce. Întârzierea de declanşare inclusiv timpul de AF este de 0,22, net mai scurt decât la celelalte modele de la Nikon. În modul highspeed, aparatul foto foloseşte o zonă centrală din imagine la o rezoluţie de 6,8 megapixeli; un complex raster electronic uşurează compoziţia fotografiei. Astfel, rata imaginilor se măreşte, conform producătorului, până la opt cadre pe secundă, dar să nu uităm că aparatul reuşeşte şi la rezoluţie maximă până la 5,2 cadre pe secundă şi 20 de imagini într-o rafală.

Accesorii pentru aparatele foto
Un Nikon vine rareori singur: numeroasele accesorii uşurează şi extind posibilităţile aparatului de fotografiat. Astfel e, de exemplu, gripul multifuncţional pentru D200, MB-D200, care poate fi dotat la alegere cu unul sau doi acumulatori Li-Ion de tipul EN-EL3e sau cu şase baterii mignon (alcaline, Li sau Ni-MH). Pentru sporirea confortului în timpul manevrării, acesta e dotat şi cu un declanşator pentru formatul tip portret, două rotiţe de reglare şi o tastă separată AF-on. Asemănător cu acesta e şi grip-ul MB-D80 pentru Nikon D80. Adaptorul WLAN pentru transmisia imaginilor spre o reţea wireless este destinat atât seriei D2 (WT-2/2A), cât şi lui D200 (WT-3/3A). În completare, mai există antena externă WA-E1 pentru extinderea razei de semnal wireless de la 30 m la 150 m, în aer liber. O altă combinaţie ar fi un aparat foto Nikon cu un receptor GPS pentru sistemul de poziţionare globală. Receptorul GPS poate fi cuplat la un sistem Garmin sau Magellan, iar coordonatele geografice împreună cu timpul global (WTC) pot fi integrate în metadatele unui fişier imagine. Astfel, un fotograf care face fotografii în deşert poate regăsi oricând locul unei expuneri care i-a plăcut în mod deosebit cu ani în urmă. Jurnaliştilor le este uşurată munca prin funcţia GPS în cazul unor evenimente catastrofale, cum ar fi inundaţiile, în acest caz reuşindu-se identificarea poziţiei din elicopter. Pentru conectarea la GPS se foloseşte cablul adaptor MC-35. Un teledeclanşator cu cablu precum MC-30 (pentru D2/D200) permite declanşarea fără miscarea involuntară a aparatului şi dispune de o funcţie de reglare a timpilor de expunere mai lungi; MC-36 permite suplimentar expunerea la anumite intervale şi dispune de un display iluminat. Şi mai confortabil: cu ajutorul telecomenzii Modulite ML-3, aparatele foto de tipul D2/D200 pot fi controlate de la distanţă prin două canale infraroşu separate; distanţa maximă de utilizare e de 8 m. Vizorul unui aparat digital SLR de la Nikon poate fi modificat în diferite moduri – de exemplu, se poate ataşa un vizor angular, care uşurează expunerile de la nivelul solului. Oferta constă din DR-5 pentru aparate cu ocular rotund (seria D2) sau DR-7 pentru aparatele cu oculare dreptunghiulare (D200, D80, D40 sau D50). Lupa de mărire (DG-2) permite la majoritatea aparatelor din seria D o mărire 2x a subiectului de fotografiat, din mijlocul cadrului. Plăci mate cu raster există doar pentru seria D2. La aparatele pentru amatori, D80 sau la semiprofesionalul D200 se poate activa un raster în vizor – o funcţie foarte practică pentru fotografia de natură statică sau arhitecturală, când aparatul trebuie să fie poziţionat perfect la orizontală.

Serii de obiective pentru Nikon
Familia de obiective de la Nikon este foarte diversificată, o privire de ansamblu fiind destul de complicată, chiar şi pentru cunoscători. Obiectivele din casa Nikon se numesc deja din 1932 „Nikkore”. Prin Nikon F, Nikon a introdus în 1959 baioneta F, care a fost dezvoltată simţitor în decursul timpului, adăugându-i-se numeroase contacte electronice, însă ca dimensiuni a rămas neschimbată. La început, obiectivele erau cuplate printr-un adaptor sub formă de cablu pe inelul diafragmei, dar care a devenit de prisos odată cu introducerea filetului AI. Acronimul AI vine de la „Automatic Maximum Aperture Indexing” şi face conexiunea directă între obiectiv şi carcasa aparatului foto. Multe - însă nu toate - obiective de la Nikon au putut fi modificate pentru noul filet AI. Cele mai multe obiective AI pot fi utilizate şi în prezent la aparatele foto moderne de la Nikon, fapt ce i-a conferit baionetei F durabilitatea în timp. Normal că în acest caz ne lipsim de focalizarea automată, dar aceasta poate fi făcută manual, cu ajutorul inelului de focalizare de pe obiectiv. Compatibilitatea acestor obiective e însă şi mai mult relativizată, dacă ne gândim la câte alte funcţii ar trebui să se renunţe. De exemplu, un obiectiv AI funcţionează la un F100 şi F6 sau la aparatele profesionale D1/D2 cu programele prioritate de timp şi măsurare ulterioară, însă nu şi cu programele prioritate de diafragmă sau de program. La toate aparatele foto din clasa sub 1.000 euro, de la D40 până la D80, prin folosirea unui obiectiv AI Nikkor cade complet măsurarea expunerii, deoarece acestea nu au modulele necesare măsurării deschiderii diafragmei. O excepţie lăudabilă o constituie D200: pentru a utiliza un Nikkor AI cu focalizare manuală, trebuie doar să introduceţi în meniul aferent deschiderea minimă a diafragmei şi distanţa focală – foarte practic pentru posesorii de obiective Nikkor vechi, a căror calitate mecanică şi optică rămâne încă şi în ziua de astăzi aproape imbatabilă. La începutul anilor '80, montura AI a fost transformată în AI-S, cam odată cu apariţia lui Nikon FA: pentru ca aparatul foto să poată efectua fotografii clare la programele prioritate de diafragmă sau de program, procesorul intern avea nevoie de informaţii despre distanţa focală a obiectivului. Dat fiind că obişnuitele obiective AI nu fuseseră proiectate pentru aceasta, toate obiectivele Nikon au fost dotate din acest moment cu montura AI-S. Obiectivele de acest tip se recunosc după culoarea portocalie a deschiderii minime a diafragmei şi după o uşoară protuberanţă pe baionetă. Şi F-301, F-501 sau F4 au nevoie de obiective AI-S pentru a putea funcţiona optim. Obiectivele cu focalizare automată introduse în 1986, odată cu F-501, corespund mecanic monturii Nikkor AI-S. Pentru focalizarea automată e activat un motor din obiectiv, care e cuplat la un mecanism de transmisie spre inelul de focalizare. O altă noutate este microprocesorul integrat, denumit şi Central Processing Unit sau CPU. Obiectivele AF cu CPU suportă toate funcţiile aparatelor SLR digitale şi analoge actuale de la Nikon, cum ar fi măsurarea în matrice 3D şi sistemul de măsurare 3D cu multi-senzor, ambele necesitând informaţii despre distanţă, de la obiectiv. Toate obiectivele Nikkor D posedă această caracteristică, la fel şi cele de tipul G. Ultimele se deosebesc de tipul D prin lipsa inelului de diafragmă; diafragma este în acest caz controlată numai cu ajutorul aparatului foto. Din 1996, Nikon produce obiective Nikkor AF-S, cu motor ultrasonic încorporat (Silent Wave). Dezvoltarea acestei linii de produse a durat însă ceva mai mult decât la concurentul principal, Canon. Obiectivele precedente erau Nikkor AF-I, care dispuneau la fel de un motor de focalizare (însă nu Silent Wave). Cei mai noi membri ai familiei de obiective de la Nikon sunt obiectivele DX, special concepute pentru senzori digitali de format APS-C. Şapte din opt obiective din această serie sunt de tipul Zoom şi AF-S, cel de-al optulea fiind un Fisheye Nikkor 2,8/10,5 mm G ED DX, care poate să se descurce fără motorul de focalizare datorită distanţei de focalizare foarte mici. Un alt avantaj este că la obiectivele AF-S, focalizarea automată funcţionează prin rotirea inelului de focalizare, făcând astfel posibilă continuarea focalizării în mod manual (mod de funcţionare M/A). În programul de obiective de la Nikon se numără în prezent aproximativ 40 de obiective cu focalizare automată. Pe lângă modelele DX amintite, se mai găsesc cam o duzină de alte zoom-uri de tip AF-S, la care se adaugă 20 de obiective fixe, de la fisheye până la super-teleobiective cu distanţă focală de 600 mm, precum şi trei teleconvertoare. Pentru apropiere, Nikon are patru Micro-Nikkor în program, cu 60 mm, 85 mm, 106 mm şi 200 mm. Un „must have” pentru fanaticii calităţii este Micro Nikkor 2,8/60 mm D AF – unul dintre cele mai bune obiective Nikon, fiind interesant atât pentru apropiere cât şi pentru portrete, corespunzând unui factor de unghi vizual de 1,5 la o distanţă focală de 90 mm la fotografia analogă. Micro Nikkor 85 mm este un aşa-numit „obiectiv PC”, denumire care nu are nimic de a face cu calculatoarele, ci cu posibilitatea de control a perspectivei, prin deplasarea axei optice. Se mai găsesc încă în comerţ obiective cu focalizare manuală, cu distanţe focale cuprinse între 20 şi 105 mm. Printre obiectivele cu distanţă focală variabilă din seria DX, se remarcă 2,8/17-55 mm G ED-IF AF-S DX; optica de înaltă calitate se îmbină cu o luminozitate de 1:2,8, făcându-l astfel recomandat pentru toate aparatele foto SLR Nikon digitale, singurul cusur al său fiind însă preţul foarte piperat, 1.400 euro. Bun şi în acelaşi timp rentabil este însă teleobiectivul AF-S Zoom Nikkor 4,5-5,6/70-300 mm G VR, la care iniţialele VR (Vibration Reduction) înseamnă că obiectivul e dotat cu un stabilizator de imagine. O listă cu obiectivele Nikkor o veţi găsi la secţiunea de tabele; cele mai multe dintre ele au fost caracterizate prin „recomandate pentru digital” pentru cel puţin un aparat de la Nikon.

Bliţuri cu i-TTL

În oferta Nikon există în prezent trei bliţuri de sistem, completate de un sistem macro-bliţ (vezi caseta). Capul de serie e SB-800, cu un număr-ghid 38 (ISO 100 la 35 mm), care are întreaga gamă de funcţionalităţi a unui bliţ extern profesional. Suportă standardul flash de la Nikon – CLS (Creative Lighting System), al cărui nucleu îl constituie controlul i-TTL. Acesta funcţionează la fel ca D-TTL cu măsurătoare a bliţului înainte de expunere, însă are în plus posibilităţi suplimentare, printre care se numără controlul prin infraroşii. Astfel, un SB-800 poate fi declanşat şi prin bliţul încorporat al unui SLR digital de la Nikon în modul master-slave. Cu tehnologia i-TTL sunt compatibile toate aparatele foto SLR digitale actuale de la Nikon; e necesar însă un obiectiv cu CPU. D100 şi modelele din seria D1 sunt compatibile cu SB-800 prin D-TTL; cu aparatele analoge, bliţul poate fi utilizat în modul TTL. În modul de funcţionare AA (automatic), bliţul stabileşte singur iluminarea corectă cu ajutorul senzorilor proprii şi a luminii reflectate de obiect. La aparatele compatibile CLS cu obiective cu CPU, sensibilitatea, corecţia expunerii, diafragma şi distanţa focală sunt transmise spre bliţ; la alte aparate foto se compară diafragma de lucru între aparatul foto şi bliţ în mod manual (modul A). La controlul manual (M) se poate varia puterea de iluminare al bliţului între 1/1 şi 1/128 în trepte de o treime de diafragmă. Pentru controlul lui SB-800 este folosit, pe lângă tasta cu modurile de funcţionare (mode), un foarte practic navikey cu patru căi şi tastă centrală multifuncţională (SEL). O caracteristică a calităţii aparatelor de la Nikon este piciorul bliţului din metal, precum şi maneta de armare în loc de butonul obişnuit, de la alte bliţuri. În pachet se mai află un softbox şi un mini-reflector care reflectă lumina pentru iluminarea indirectă, generând astfel sclipiri în ochii persoanei folosite ca subiect într-un portret. Pe lângă SB-800, Nikon mai are în ofertă alte două bliţuri: SB-600 cu un număr-ghid 30 (ISO 100, la 35 mm), bine dotat şi o alternativă rentabilă la modelul de vârf. Mulţumită integrării sistemului CLS pot fi utilizate mai multe SB-600 într-un conector multi-bliţ şi controlate cu ajutorul unui bliţ master SB-800. Şi în acest caz, controlul poate fi preluat de bliţul integrat în aparatul foto. În final, SB-400: extrem de compact, cu numărul-ghid 21 (ISO 100, pe 35 mm), un ajutor probat pentru cazurile în care bliţul aparatului foto nu este îndeajuns sau apare dorinţa unei iluminări indirecte (reflectorul poate fi rabatat) – o completare foarte bună la compactul D40.

SOURCE

technorati tags:, ,