Infrared Photography with a Digital Camera
It was more than thirty years ago when I last experimented with photography in infrared. Too much hassle: special film handling, black-and-white processing, inability to evaluate results (and adjust settings) until the whole roll was exposed and pictures were printed... | |
| Now this has changed. Due to the arrival of digital photography, we can take infrared pictures whenever we please, mixing them with "normal" ones, and see results on the spot, tweaking the settings to our hearts' desires... All depends, of course, on how your camera sensor array reacts to the infrared — and, depending on the filter you are using, to the far red end of the visible spectrum. |  Olympus C-5060WZ, Hoya R72 filter |
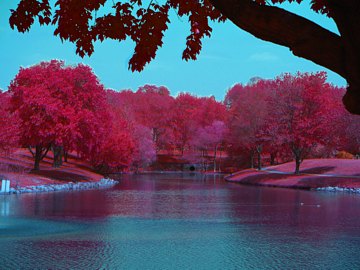
| This can be explained with the graph at the right, showing the fraction of light reflected off various materials at various light colors (wavelengths). The height of the curves to the left of 600 nm shows how bright these materials are in visible light; to the right of 700 nm — how bright they are in infrared. The most dramatic difference between the visible and infrared spectrum is in case of foliage: it does, indeed, become very bright in infrared; very much like you can see in my photographs shown here. (Source: Kevin Frankel at al., Concealment Of The Warfighter’s Equipment Through Enhanced Polymer Technology, 24th Army Science Conference Proceedings, Orlando, FL, 2004) | 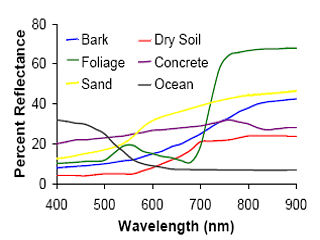
|
| To answer the question briefly: photographs in infrared show quite unusual tonality, different than that to which we are used, and this may make them esthetically pleasing, at least in many cases. Which, of course, is a matter of taste. | |
| Camera | C-5050Z | C-5060WZ | E-10 | E-20 | E-300 | E-500 |
| Exposure Factor | 11.5 EV (3000×) | 7.3 EV (150×) | 10.3 EV (1300×) | |||
| Typical Exposure | 2 seconds at F/4 | 1/8 s at F/4 | 1 s at F/4 | |||
| For other cameras, check for yourself before investing into any filters. You may also find data on selected models at Jen Roesner's site. A few of the Sony models (Sony DSC-F707/717/818 in this number) allow you to move the anti-IR filter out of the light's way; unfortunately, Sony went to great measures to make this feature unusable in daylight, as it is supposedly making some clothing partially transparent to infrared. (I would also like to turn Sony's attention that the big lens in the '717 can be used to hurt babies and puppies.) Some people modify their cameras by removing the anti-IR filter (sometimes replacing it with a glass plate of equal thickness). This is a tricky operation, but it will usually increase the camera's IR sensitivity dramatically. Obviously, the camera's color performance in visible light will be degraded, and your warranty will be voided. Digital SLRs are not my first choice for infrared, for a two major reasons. First, this class of cameras (with a few exceptions, see below) does not offer real-time electronic preview, because the light from the lens reaches the sensor only during the actual exposure. This means that you have to put the camera on a tripod, compose the picture without the IR filter, then put it on and shoot blind. Two notable exceptions are the older Olympus E-10 and E-20 SLRs which use a beam-splitting prism and allow for real-time preview, and the more recent Olympus (again!) models, with the Live View feature: the E-330, E-410, and E-510. Second, the light metering in digital SLRs is not done by the image sensor itself (like in non-SLR models), but by a separate set of sensors, which may have a different response to infrared. You cannot rely on camera's autoexposure (although you may be able to work out a correction applicable to a given camera/filter combination). This is why for infrared I prefer optical finder, non-SLR cameras, like the C-5050Z or C-5060WZ (or the two-of-a-kind E-10/E-20 as mentioned above). A hardcore infrared aficionado may decide to splurge $1800 to get the Fuji S3 Pro UVIR. This is a modification of the "regular" S3 Pro, intended for photography in the infrared or ultraviolet part of the spectrum. In this model, the anti-IR filter (also blocking UV light) in front of the CCD has been replaced with a plain glass plate, so that the overall infrared sensitivity is vastly increased. The camera also allows for live digital preview of the image, very much like in the Olympus Mode B (see the section on image preview below), but limited to 30 seconds. I've never used the S3 (modified or not), so I will not go into details; besides, if you are interested in it, you probably know more about infrared photography than I do. In any case, I wasn't able to find any infrared samples from this camera on the Web, so I do not think it is much used outside of scientific and law-enforcement applications. Then you need an infrared filter. You can buy these from any dependable mail-order supplier, like B&H Photo. Various filters may differ in the visible light cut-off point (see the table below). The Wratten #89B (available as Hoya R72), with the light transmission falling down to 50% at 720 nanometers, seems to be most popular and gives the greatest chance of success. The darker #87 or #87C may or may not work, depending on the camera, while the almost-IR #70, while allowing for shorter exposure times, does not provide the eerie Woods effect on greens. You also need a way to attach the filter to your lens. This is easy with SLR and digital-finder models, but digital compacts may pose a problem. WIth very few (like the Olympus C-5060WZ) you can do it directly, as the lens is threaded; with others (actually, all other compacts on the market) you will need a lens adapter tube, like the 41-43 mm CLA-1 attachment for the Olympus C-5050Z (plus a step-up ring).
A tripod is essential. For the #89B (R72) filter you will be getting exposures of 1-2 seconds or more at F/4 and ISO 100. |
| |  Olympus E-20, Hoya R72 |  Olympus E-20, Hoya R72 |
| Wratten | Schott | B+W | Hoya | Tiffen | 0% | 50% | Remarks |
|---|---|---|---|---|---|---|---|
| #25 | OG590 | 090 | 25A | 25 | 580 nm | 600 nm | Really a red filter |
| #29 | RG630 | 091 | - | 29 | 600 nm | 620 nm | Dark red |
| #70 | RG665 | - | - | - | 640 nm | 680 nm | Very dark red |
| #89B | RG695 | 092 | R72 | - | 680 nm | 720 nm | Almost "black", but not quite |
| #88A | RG715 | - | - | - | 720 nm | 750 nm | I've never seen this one |
| #87 | RG780 | - | - | 87 | 740 nm | 795 nm | Cuts off all visible light |
| #87C | RG830 | 093 | - | - | 790 nm | 850 nm | Usually called "black" |
| #87B | RG850 | - | RM90 | - | 820 nm | 930 nm | Expensive! $250 & up! |
| #87A | RG1000 | 094 | RM100 | - | 880 nm | 1050nm | Blocks even some of infrared |
| The data above is quoted after W.J. Markerink. For those who would like to have a closer look at IR filter transmittance, here is a graphic representation: | |
| | The graph shows the transmittance of various filters as a function of the wavelength. It is based on data by Paul Repacholi (Curtin University of Technology, 1992), posted by W.J. Markerink and also by Eric Cheng. The logarithmic scale is used here, as it fits the problem better: differences, say, between 1% and 10% are by far more meaningful than those between 91% and 100%. It can be clearly seen that #89B (R72) still allows through some of the far red (just below and around 700 nm), #87 starts only around 740 nm. |
| Just a reminder: the human eye is sensitive to wavelengths up to 700-720 nm or so. Because the anti-IR filters in digital cameras block most of the infrared, even slight differences in filter transmittance may have strong effect on results (and exposure). Therefore two filters listed as equivalent in the table above may deliver slightly different results on a given camera. Recommendation: I believe the most useful, general-purpose IR filter for digital photography is Hoya R72 (#89B). It blocks visible light well enough (if not entirely) to provide a well-pronounced IR effect, while still allowing for non-exotic exposure times. This filter should work fine with most of mid- to high-end amateur digital cameras (your mileage may vary, so check with someone who tried it on your camera). The small amount of visible (far red) light which this filter lets through does not affect pictures enough to spoil the IR effect, while coloring your images red (or purple), therefore they need to be converted to monochrome in postprocessing. The #87 filter is more expensive and more tricky. Many digital cameras will not be able to "see" through it, while some others may work — again, check with their users. I have tried it with the Olympus E-300: the exposures are much longer As mentioned in the SLR section above, most of digital SLRs do not allow you to use the LCD monitor for picture preview and composition. You have to compose in the optical finder without the filter (using a tripod, of course), then put the filter on the lens, and shoot blind. If you have a digital SLR and intend working in infrared, you may be better off getting an inexpensive non-SLR model specifically for infrared. You need a small backup camera anyway. Digital non-SLR cameras (including EVF ones) are more convenient in this aspect, as you can view and compose the image on the monitor as normal; the preview will be red or purple, of course, and quite dark, but usable for these purposes. As mentioned before, the E-330, E-410, and E-510 from Olympus do not suffer from this: their Live View feature allows for electronoc image preview with the filter on. | |
| Your exposures will be quite long: an IR filter combined with the camera's anti-IR one will let through less than 0.1% of the incoming light. A bright scene, requiring 1/500 s at F/8 in visible light will need about 1 s or longer at F/4 on most cameras. Not only this asks for using a tripod, but, if the air is not quite still, there will be a blur in the foliage, grass, water reflections, etc. This is not necessarily a bad thing, and it may add an extra feel to the image. Here is an example. I like the contrast between the sharp (immobile) planks, and the fluid, fuzzy grass. A matter of taste, of course, but it was quite windy that day. |  Olympus E-500, Hoya R72 (XGA here) Olympus E-500, Hoya R72 (XGA here) |
| Your infrared images do not have to be monochromatic (like black/white or sepia). There is some color information in the image file, and while it has nothing to do with reality, it may be used to generate quite pleasing images. The easiest way to do that is to split your image into individual RGB components, adjust each separately, and then recombine them. Here is an example of such a treatment, borrowed from my |  Olympus C-5060WZ, Hoya R72 | |
| Another field for experimentation opens itself if you have two versions of the same image (identically framed): one shot with, and one without an IR filter. Bringing both into an image editor, splitting them into R, G, and B layers, and then recombining the R layer from the IR image with G and B (possibly swapped) from the visible-light one gives efefct which is sometimes compared to that of the Ektachrome false-color IR film. Some tonal adjustment of individual layers before recombining them may improve the effect. | ||
 The red layer from an IR image combined with green and blue ones from a visible-light picture. | Frankly speaking, this is too intrusive for my taste, and the effects will be eye-pleasing for very few subjects. The example I'm showing at the left is just plain ugly. You may have more luck (or skills). In general, I prefer my infrared pictures to be monochrome, sometimes tinted just a bit towards warmer shades. | |
| Infrared images exhibit more noise than visible-light ones. First of all, the exposures are 1000 times or so longer than in "normal" pictures, and that's when the noise always shows up. Another factor is that the image is created mostly in the red component, i.e., using only the R (red-sensitive) photosites of the image sensor. In the most commonly used Bayer matrix arrangement, out of each four photosites (sometimes wrongly referred to as pixels in this context) one records red, one blue, and two — green component of the image. Only when the raw image is being converted to RGB, the missing values are interpolated, so that a pixel (all three components) is created for each photosite location. This means that your eight-megapixel camera records just two megapixels of information, plain and clear; for the R and G photosites the whole signal is just interpolated from their R neighbors. The photosite size, however, remains still at the 8 MP level, just 25% of what it would be for a 2 MP sensor of the same physical size. Last but not least, the image has to be kept within just a partial luminance range (read: dark), to avoid overloading the red channel, as I already described above. For a more natural look this limited tonal range will have to be, after desaturation, stretched to the full luminance range. This leads to (usually) doubling of the visible noise amplitude. One may argue that the last two effects partially overlap, i.e., I am listing the same thing twice, but still — the noise is there, much more of it than in visible-light images, be it color or monochrome. Some photographers (especially those who never printed anything above 4x6" from their film cameras) are allergic to noise in digital images. Others, however, are so used to the large grain in infrared films, that they consider the noise a part of the "infrared look" and want to emulate the effect in the digital medium. If you dislike noise in your IR images, tough: it will be there. You will have much more of it than in "regular" color pictures. If you find the noise objectionable, try to keep it down by using the lowest ISO setting of your camera and opening the aperture as wide as your lens allows (this will, however, reduce the available depth of field, not always desirable, especially in view of possible focusing problems, already discussed). Remember also that the infrared image should be underexposed only enough to avoid the red channel overload — but not more, as this will result in more noise amplification when the tonal range is restored. If you are not sure, use exposure bracketing until you get the hang of it. Much of the noise can be removed quite well with use of an image-processing program, or, usually more effectively, with a dedicated noise removal application (or plug-in), like, for example, Neat Image. The latter does a very good job, and has a wide range of available adjustments. Still, we are walking a tightrope here. While a moderate amount of noise can be often removed quite nicely, quite often I find that really noisy images look better without that operation, which often leads to excessive loss of texture detail and an unnatural, plasticky look. Be careful and keep the originals in case you change your mind later. Many photographers, to the contrary, like the noise effect, as it is often associated with the "classic", grainy infrared look. Actually, from time to time I'm receiving emails how to bring more noise to infrared images! To emulate the IR film grain effect, some writers recommend adding artificial noise in postprocessing. I'm not happy with that technique, preferring rather to intensify the natural noise pattern of the CCD. This can be done by setting the CCD sensitivity to the equivalent of ISO 400 (or higher, if your camera allows it). With all cameras I've tried, a one-second exposure at ISO 400 shows more noise than a four-second one at ISO 100, so this will help. As a side effect, it will also reduce the exposure time. To make the noise more visible, you may also underexpose your pictures by one or two EV, and then stretch the tonal range in postprocessing to recover the shadows and highlights; this will also amplify the noise considerably. This technique takes less time to apply than to describe, see an example below. Just remember that the tonal smoothness of the result may be affected, therefore it may be better to convert your image to 48 bits (16 bit per color), do the processing, and only at the end convert it back to 24 bits. The noise amplitude will remain unaffected by the switch to 48 bits, but the tonality will be smoother. |


 Olympus C-3000Z; Wratten #70 | A deep-red filter may still provide very nice monochrome images, as long as you do not have to have the Woods effect. I'm using it from time to time, and the extra advantage is that with the exposure multiplier you can get away shooting from hand. Some examples are shown in my C-3000 almost-IR sample page. | |
| The most rewarding subject to shoot in infrared are sunny outdoors scenes, especially with lots of foliage, grass, and water, preferably with some nice, white clouds in the sky. Morning and evening sunlight is richer in infrared than midday one, so the glowing Woods effect in the foliage will usually be more pronounced. As always in photography, this, however, is not an iron-clad rule. Sometimes an image shot under a cloudy sky may carry a strong visual message as well. For example, I like the one shown in the preceding section. I shot another frame at the same location on a sunny day, and it was, I would say, more trivial. Buildings, especially with bright walls, look really good on the background of the dark, almost-black sky. Some people recommend IR for shooting cemeteries, as the subject goes well with the unreal feel of the medium — but, after all, how many cemetery pictures can you take? | ||
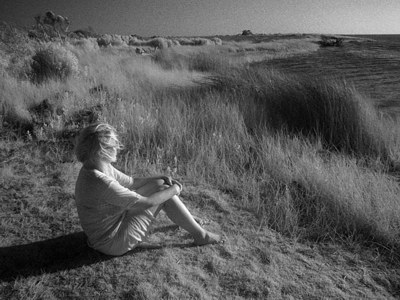
| Don't limit yourself only to the bright greens and dark sky. Even scenes without those telltales of infrared will have a different tonal gradation than a "normal" picture converted to B&W. Look, for example, at this one. Looking at this picture (shot at 1/8 s and F/1.8) now, I think I should have closed the aperture down to F/8 in order to have most of the people shown as streaks of movement at the exposure of 2.5 seconds; with some luck I could get one stationary person in the middle, a real keeper. Well, next time. |  Olympus C-5050Z; Hoya R72 (XGA here) | |
| The eerie atmosphere of IR pictures goes well with adventurous, off-balance composition. Remember the pictures you were taking as an 18-year old, aspiring photographer? Try that again. (I will, too, try to break that lame habit of neat, even framing, acquired after having grown out of that period.) | ||
 Olympus C-5060WZ, Hoya R72 filter | Infrared is not a common medium for people shots, but I have seen some very good IR portraits. Outdoors portraits or nudes with the surrealist background may have a strong impact. The skin becomes more white, with most imperfections (and texture) gone, which may be related to the partial transparency of its outer layers to the longer wavelengths, and the porcelain-like tonality quite interesting. Check out, for example one of Eric Cheng's IR galleries (shot with a modified camera, with the IR-blocking filter removed). | |
|
| ||
technorati tags:photography, digital, infrared, technique
![]()


No comments:
Post a Comment